Milky Way at San Pedro
New Journal 18 – San Pedro
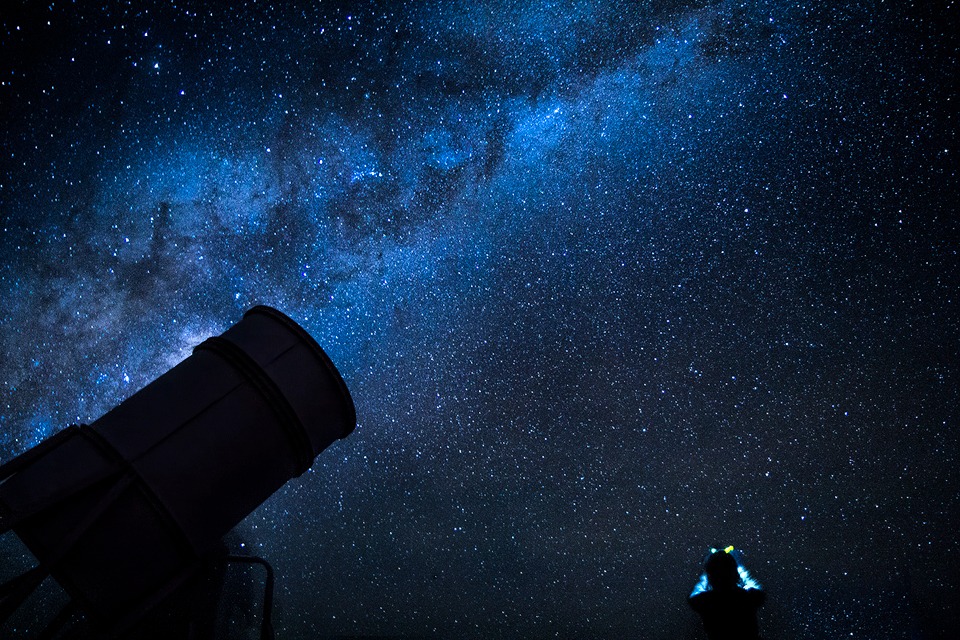
As we stared up to the brilliantly shining Milky Way, a shooting star flashed into our view and disappeared again almost as quickly . We were standing in the desert. We were silent. We felt inspired and insignificant at the same time. San Pedro De Atacama is one of the best places in the world to view the Milky Way. The scene was intense, I literally felt blanketed in stars.
At 2,400 metres I wasn’t expecting to feel any effects of altitude. We’d been warned to drink a lot of water. I decided that the shortness of breath I was experiencing was a case of being uselessly unfit. Travelling has done little for my cardio vascular fitness. Rachel says it’s because I’m lazy. I’m not convinced.
We were being guided around an observatory just outside the tiny desert town of San Pedro, our home for the next few days. It was bitterly cold. Yet, bearing witness to such beauty can dull the physical senses while inspiring the mind.
My only desire was to take photos but I had to wait an hour for the lecture to finish. The lecturer had an intense green laser pen that shot up to the stars as she explained the constellations. A real life light saber. It was incredible. I later inquired to a member of staff where I could get one of these weapons and if it was capable of killing a man.
As the night drew on I managed to put my camera into action. Eventually we slowly headed back to San Pedro. Made of sandy streets and dirt-style buildings, it’s a town right out of Speghatti Western movies.
We came to the Atacama desert to find inspiration and beauty. It took less than 12 hours to achieve just that. With 3 more nights here and a few trips planned, I simply cannot wait to see what more this isolated place has to offer.
The Cool Bits – Technical Info
Processing Time: 35 minutes
Processing method: Photoshop ACR
No. of Exposures: 1
EV Range: N/A
Shutter Speed: 20 seconds
Aperture: f/2.8
ISO: 1250
Focal Length: 17mm
Lens: Canon 17-55mm
Camera: Canon 60d
Plugins: Nik Color Efex for detail extraction and shift in lighting
Luminance Masks: N/A
Photomatix Settings: N/A
Join Me on Facebook or Google+
![]()
![]()
Today’s Photo – The Milky Way at San Pedro
Here are some star shooting & processing tips:
To manually focus, point your camera at a distant light and focus on that. It must be at a good distance. This point we call infinity. If you’re going somewhere where no lights are present, you can do it before you get there.
Set your White Balance to Tungsten for a blue effect, otherwise leaving it on Auto will usually generate a brown colour.
Try not to set your shutter speed to more than 20 seconds otherwise you may catch the movement of the stars (which is actually the movement of the earth).
Look for a good foreground element. There wasn’t much going on at San Pedro, sadly. I was extremely fortunate when someone popped their head in my shot to take a photo. It gives an extra dimension to the image, adding to its vastness.
Don’t be afraid to take multiple shots, one to expose for the foreground and one for the stars.
Bring a torch which you can use to illuminate foreground elements. A quick flash of the torch is more than enough.
Bring the highlights up to increase the brightness of the stars in either Ligtroon or ACR. Using the brush option will be more effective if you have objects which you don’t want to affect.
Clarity in lightroom and ACR is the best little slider ever for Milky Way shots. Use it liberally.
Reminder – Download Luminance Mask Actions
You can download my 18 point luminance mask actions for Photoshop completely free – [wpdm_file id=1]
Before the Joys of Post-Processing


Share this:

This entry was posted on Friday, June 7th, 2013 at 2:56 am
You can follow any responses to this entry through the RSS 2.0 feed.
Thanks a lot Don!
Such beauty Jimmy. Love the stories and photo tips etc. keep it up. 🙂
Thanks a million Chris. I’m glad you’re enjoying the blog.
Rocked this one man, awesome shot!