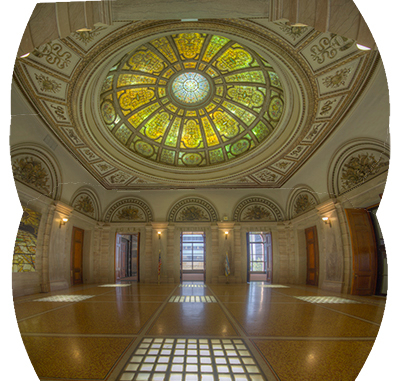
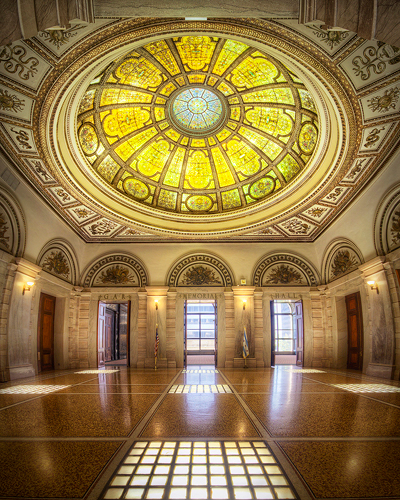
The Cultural Centre in Chicago

New Journal 30 – Catching the train
We sat up, awake. Darkness filled the train carriage and barely a noise was made, as you’d expect at 3:00am. An Amish couple behind us whispered something. We weren’t the only ones still awake. The train windows became a movie theatre for an unknown period of time. The scenery wasn’t much to take in, but a massive storm was lashing across the sky. Lightning began illuminating the entire carriage.
While lightning flashed all around us, at no point did thunder reach our ears. I’d never seen such a constant barrage of flashes in my life. The entire sky seemed to be at war. It was terrifying and thrilling all at once.
Rachel and I sat and watched while most of those around us slept soundly. As the train slowly passed the storm, we drifted into unconsciousness. There’s nothing quite like travelling by rail.
It’s now 9:00am. We’re in a leafy suburb in Denver. A few locals are enjoying a morning coffee in the only cafe we could find open on a sleepy Sunday morning. We’re too early to check in to our accommodation.
It’s incredible how quickly the scene changes around you when you travel. Even more amazing is the way in which it all becomes normal. In two days we’ll be in the national parks around Moab – another drastic change of scenery that we’re looking forward to.
The Cool Bits – Technical Info
Processing Time: 1 hour and 45 minutes
Processing method: Photoshop & Photomatix
No. of Exposures: 3×3
EV Range: -2 0 +2
Aperture: f/8
ISO: 100
Focal Length: 10mm
Lens: Sigma 10-20mm
Camera: Canon 60d
Plugins: Nik Color Efex for detail extraction, shift in lighting, color correction & contrast adjustments
Luminance Masks: N/A
Photomatix Settings: Default> Strength 95 > Saturation 36 >Luminosity 1 > Lighting Adjustments 4 > Gamma 90
Join Me on Facebook or Google+
![]()
![]()
Today’s Photo – The Cultural Centre, Chicago
With almost every image, I adjust contrast in three main ways – locally, globally and specifically. To be clear, by ‘locally’ I mean I make finer contrast adjustments on smaller objects, usually using Nik Color Efex’s Pro Contrast. By ‘specifically’ I mean I add contrast adjustment layers only to specific areas of the image. For example, to really make the floor pop, I added a strong curves layer and masked out every other part of the image where it would have been too strong.
If you find that the colours are a bit uneven after applying a specific contrast adjustment, you can change the Blend mode of the adjustment layer to Luminosity, which will affect the contrast change without the deepening of colours.
Reminder – Download Luminance Mask Actions
You can download my 18 point luminance mask actions for Photoshop completely free – [wpdm_file id=1]
Available Tutorials:
Before the Joys of Post-Processing

Before – notice the White Balance mistake!

After stitching the 3 Photomatix ouputs
Cleaned and final image
Share this:

This entry was posted on Sunday, June 23rd, 2013 at 3:46 pm
You can follow any responses to this entry through the RSS 2.0 feed.