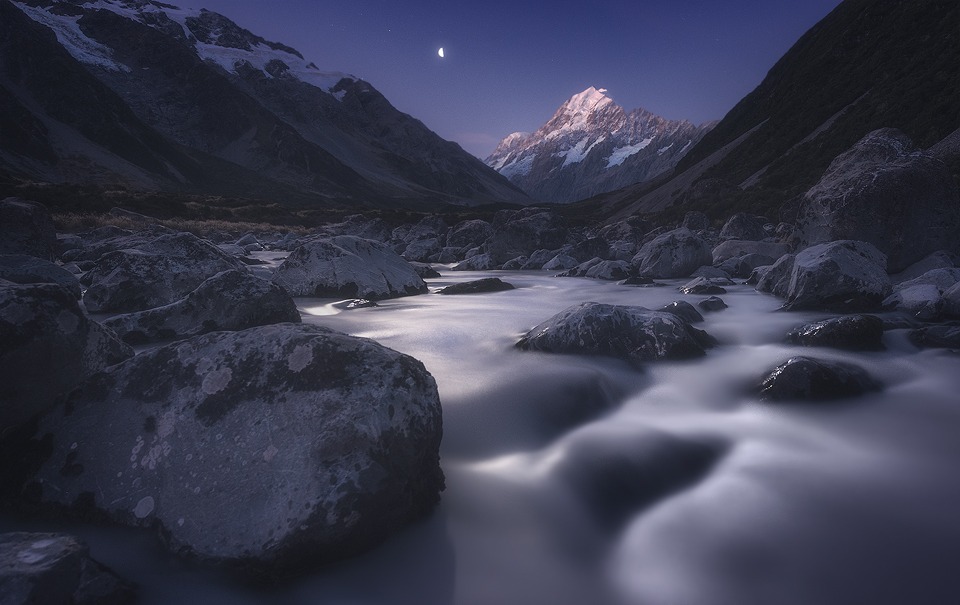
Moon River – Mt. Cook and Hooker Valley at Night
Moon River – Mt. Cook and Hooker Valley at Night
One of the interesting things about being a landscape photographer is how much we miss while we’re shooting. Every now and then I’ll be working with my camera, capturing nature’s display, and realise that I’m so focused on what I’m doing that I’m missing the truly stunning scene in front of me.
I fail, sometimes, just to breathe it in and enjoy it. One of the great things about travelling with my wife, who isn’t a photographer, is that she grounds me during times like these. When I was shooting on Moeraki beach, for example, the sunrise was incredible, but the shoot was challenging due to large, unpredictable waves. So my sole focus was trying to capture the shot I wanted.
Af ter the shoot, I was excited to get back and see some of the images on the big screen. But my wife, Rachel, had other plans. Instead, we sat on the beach, soaked in the sun and watched the last remaining photographers slowly disappear. I’m glad we did that. It made me appreciate the beach for more than it’s photo-potential.
Fortunately, since our trip around New Zealand hasn’t been a whirlwind tour, we’ve had a chance to explore areas more, run around beautiful trails and really take in its beauty.
When shooting the scene above, the situation was completely different to Moeraki. The water was running smoothly, the conditions weren’t changing very quickly, so I just sat on a rock in the river, with my legs dangling in the water.
It was such a lovely, laid back experience. It was dark, with very few passersby, and every now and then I’d shine my torch towards the riverside and see glowing eyes staring back at me. I had no idea at the time what the eyes belonged to, but they didn’t seem in a hurry to attack me so I wasn’t worried.
I was almost sad when it was time to leave my rock and rejoin the real world. But as I was returning to my car along the trail, once again there were glowing eyes, staring back at me. There were four in total along the track. As I neared the first one, I could see it was a possum. It just stood, about 3 meters away, watching. Then as I got closer, it slowly sauntered away.
I stopped for a few more moonlit shots along the trail, in no hurry, just seeing what happens.
This image is one of those which I don’t expect to be particularly popular – but because I enjoyed the relaxing shoot so much I have a soft spot for it 🙂
________________________________________________________
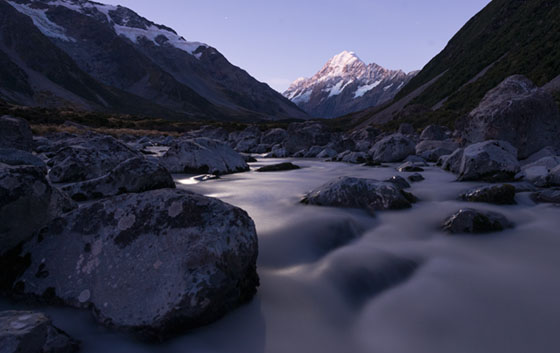
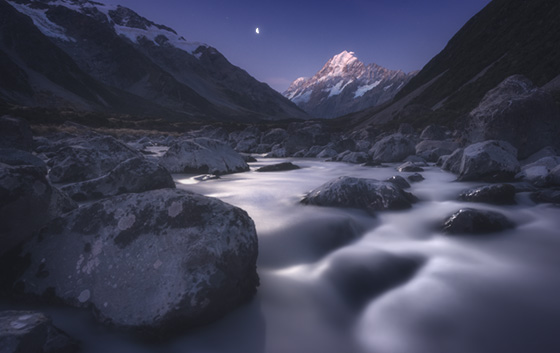
How I Created The Image – Before/After Post-Processing
The Cool Bits -Technical Info
Processing Time: 40 minutes
Exposure Blending method: Apply Image in Raya Pro
No. of Exposures: 2
EV Range: +1, -2
Aperture: f/7.1
ISO: 1270
Focal Length: 19mm
Lens: Nikon 14-24 f/2.8
Camera: Nikon D800
Plugins: Nik Color Efex
Luminosity Masks: used to create softer shadows.
Workflow Explanation – Hooker Valley & Mt. Cook
This image was created using Raya Pro – The Photoshop Plugin.
This image is composed of two exposures, 3 stops apart. I blended the images using Apply Image in Raya Pro. It was very straight forward blend. Essentially I used the darker exposure to control the highlights in the sky.
The moon was actually in this scene – the before/after comparison shows the scene after I cropped it. Since I cropped the moon out, I decided to have a little artistic license and slide it down, back in to view.
Although the sky wasn’t particularly over-exposed in the initial shot, it was too distracting for two reasons. Firstly, there are two main areas of interest in the image: the moonlit water and the mountain in the background (and the moon to some degree).
However, my eye was being pulled towards the bright sky first, instead of the water or mountain. Darkening the sky, not only added to the night time mood, but also helped to put emphasis in the correct areas.
In case you missed, I recently started a new YouTube series called Photo Talk, where I talk about the theory behind processing and shooting, but also throw in some useful techniques. The first talked about how to deepen mood with darkness, which is exactly what I’m talking about here. You can check the video out in this link: Photo Talk: How To Deepen Mood By Darkening Your Images
The only local contrast I added via Nik Color Efex’s Pro Contrast filter, was to the mount cook, at the back. I wanted to make the details and snow really pop.
For the rest of the image I decided to soften the contrast. You can see how I do that in the video I linked to above.
I created a fairly strong Orton Effect with Raya Pro to create a dreamy, night time feel. You can see how to do that here, if you don’t use Raya Pro: Quick Photoshop Secrets 7: How To Create a Dreamy Orton Effect
I dodged the highlights in the water to brighten them up.
I then added some blues to the shadows via a Color Balance layer, just to emphasize that cold mood.
And I finished by creating a custom vignette that you can learn to do here: Quick Photoshop Secrets 9: Awesome Vignette For a Moodier Scene.
Finally, the image was sharpened and resized using my free sharpening tools, which you can download here: Quick Photoshop Secrets 16: Perfect Sharpening & Resize for the Web
As always, I hope you found this useful.
Jimmy

Share this:

This entry was posted on Sunday, May 8th, 2016 at 9:50 am
You can follow any responses to this entry through the RSS 2.0 feed.
Very nice. Did you use an nd filter while taking the shot ?
Bought Raya Pro last week still playing with it so far it Great.
Keep them coming Thanks for everything you do for us
Hi Barry, no ND filter here. The low light allowed me to stretch the exposure to 30 seconds without any filter 🙂
That’s a beautiful, moody image, Jimmy. Really nicely developed too.
Well, I really hate to do this, but I must contradict your statement. You think this won’t be a popular image? HA! I do! Man what a shot! I love this photo. Everything about it is perfect; composition, color, moon, shutter speed, the treatment. This is a master piece Jimmy. And I love the story behind it too. Really adds that special something to the photo. I am going to start giving my best work more attention in the written description. I can see it adds a lot, though I am not the writer, nor photographer, that you are. I love your work, keep it up, even if it does make me insanely jealous.
Thank you for the awesome comment, Larry. I often regret not putting more effort into the writing aspect of my blog. After processing, writing the workflow explanation and EXIF data, I’m usually pushed for time to get something interesting down. Hopefully it can improve over time.
No need to be jealous. I love my job, but as with anything, there are challenges, and you’re usually a long way from home. But I am fortunate to be able to visit such wonderful places.
p.s., the shutter speed of the main exposure is 30 seconds.
Cheers
Oh, and I would like to know the shutter speed you used too.
One question Jimmy.
How can you get this deep of field with an Aperture of f/7.1?
Your Stones in the foreground are sharp and also the rock in the background.
That’s mostly because he is using very wide angle lens.
And also try to work at the hyperfocal distance of Your lenses!
Hi Mario, thanks for the comment. f/7.1 is still a good aperture for capturing sharp image throughout, especially with the 14-24mm lens. Another thing to consider is that I have cropped this image a little bit, so although I was close to this rock, the crop makes it seem I’m closer than I really was 🙂
I use the 16-35mm lens of nikon.
You think i should change it for the 14-24?
Depth*
Well, that’s the spirit and power of lightroom.
See this http://www.postprocessingcompany.com/real-estate-post-processing/
that’s one of samples in postprocessing.