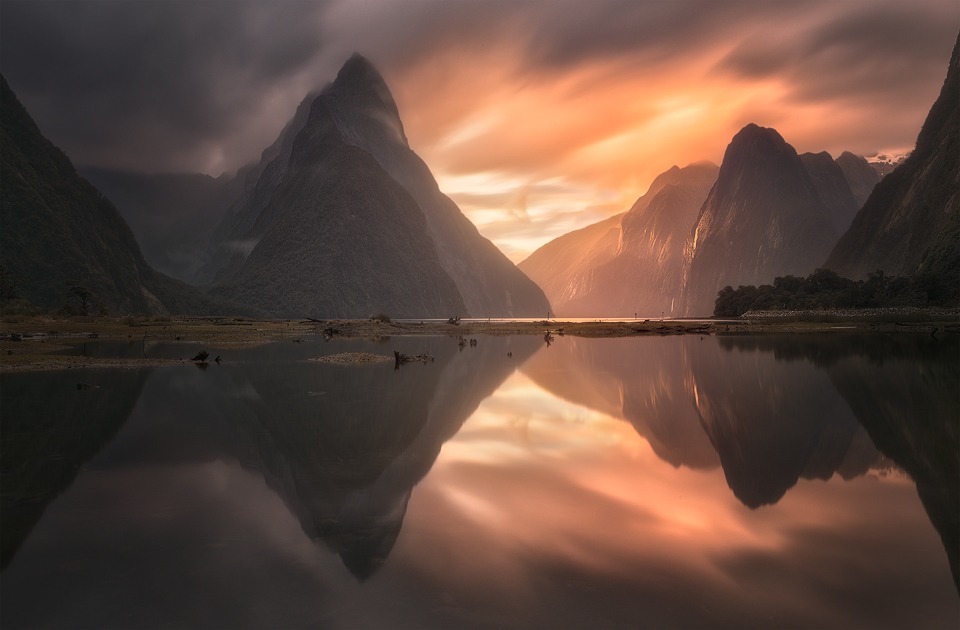
Epic Sunset Over Milford Sound
A Surprise Sunset at Milford
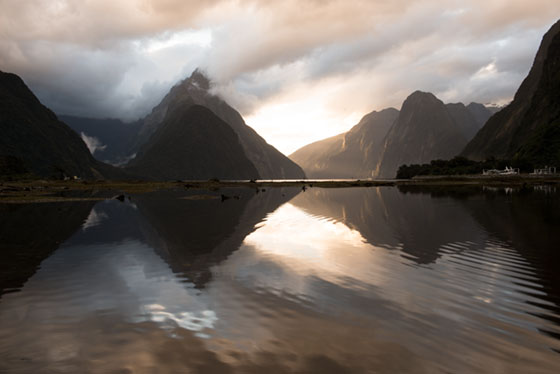
It had been raining all day. I was waiting for sunset but didn’t have high expectations. Milford Sound is famously rainy and there hadn’t been even the slightest glimpse of a sky since we’d arrived earlier in the day – just thick clouds and rain. But of course, as photographers, we are naturally opportunistic. You just never know what is going to happen. And on this occasion, everything worked out beautifully. But I nearly ruined the shot.
When I arrived at the location, the rain started to disappear. All of a sudden, the clouds parted and a ray of light shot through, all along the sound, lighting up the sides of the mountains.
I quickly captured some short exposures, but had a strong suspicion this scene would look much better as a long exposure.
I chose my setting, focused the lens, put on my B+W 10-Stop and fired off a long exposure. Once it had finished I checked to confirm that the image was sharp, which indeed it was. This was a brighter exposure which I would use to recover the darker areas in the scene.
Switching my settings, I now aimed for a darker exposure which would expose for the sky and make up most of the image. 2 minutes went by and the shot was finished. I reviewed the image. It was terribly blurry. The wind must have knocked the tripod during the long exposure.
I re-focused and shot again – 2 more minutes passed by. The light began to fade slightly. I reviewed the image once it was done. Blurry again. What was going on? I knew the camera hadn’t moved during those two minutes.
At this point, there was no more light along the sound and the side of the mountains. I was worried. I knew I wouldn’t have much time for the little colour left in the sky, and the long exposure I’d shot first was terribly over-exposed in the sky, around the sun.
Then it hit me, every single shot I take I manually focus. However, I suddenly remembered that I was taking a few test shots with this lens a few days before and had set it to auto-focus. I’d completely forgotten to switch it back. It didn’t occur to me to check because, by pure luck, the first long exposure had come out sharp. Relieved that I’d discovered the problem, a little frustrated that I’d made such a silly mistake, and worried that I would lose the last remaining light in the sky, I quickly switched to manual mode, unscrewed the filter (I wish B+W didn’t use screw on filters), manually focused again, screwed the filter on, pressed the shutter and crossed my fingers. I watched as, towards the end of the exposure, the sky faded to grey.
When the camera clicked I had no idea what I’d see in the preview, but to my delight, the image came out perfectly. The sky was nicely exposed for and the image was sharp.
In total I had about 15 minutes of light and was lucky to come out with this image. This is one reason why so many photographers don’t try long exposures. Sometimes we only get a few minutes of beautiful light and one mistake with a long exposure could cost us a good image.
Usually, I’m extremely pragmatic about preparing my camera and lenses beforehand, but this time I almost slipped up. Looking on the bright side, however, during those frantic 15 minutes I didn’t really mind the hundreds of sand flies crawling around my face, up my nose and in my ears.
P.s. any photographers in Milford, if you happen to see a remote shutter release for Nikon, it might be mine. Take care of it – it was a good servant until I lost it!
________________________________________________________
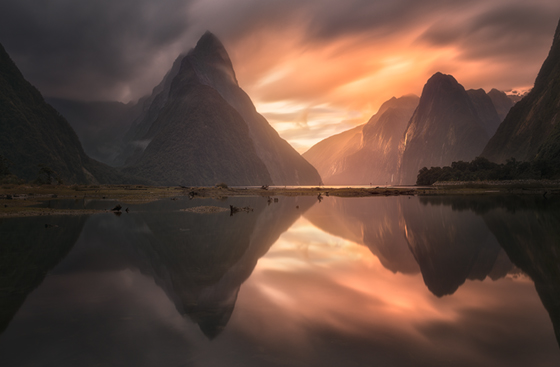
How I Created The Image – Before/After Post-Processing
The Cool Bits -Technical Info
Processing Time: 40 minutes
Exposure Blending method: Apply Image in Raya Pro
No. of Exposures: 2 long exposures.
EV Range: N/A
Aperture: f/22 (darker exposure) & f/11 (brighter exposure)
ISO: 100
Focal Length: 32mm
Lens: Nikon 24-70 f/2.8
Camera: Nikon D800
Plugins: Nik Color Efex
Luminosity Masks: used to create softer shadows and select the tree
Workflow Explanation – Milford Sound
This image was created using Raya Pro – The Photoshop Plugin.
I created this image from 2 long exposures. The brighter exposure was shot at f/11 and 109 seconds. The darker exposure was shot at f/22 and 123 seconds. The darker exposure made up most of the image, while the brighter one restored some of the darker areas.
Exposure blending was quite straight forward. I used a Darks 4 luminosity mask from Raya Pro to paint in the darker areas from the brighter exposure. I then manually painted in the beam of light coming through the sound and on the sides of the mountain from the brighter exposure. The light had faded by the time I’d shot the darker exposure.
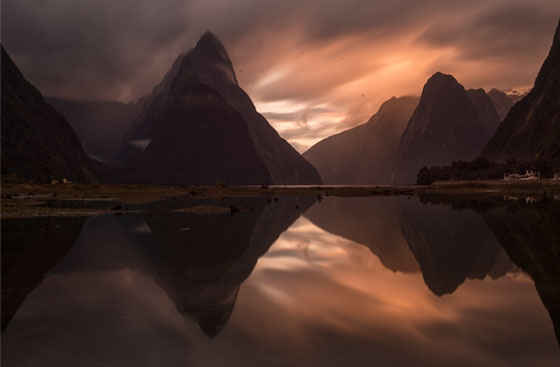
I chose long exposures because I thought the clouds would take on a more interesting smooth texture, and because the water was moving, which prevented a clear reflection. Here is the short exposure I took:
In terms of processing,I stretched the image upwards to exaggerate the size and impact of the mountains. The shorter exposure is what they originally looked like. I colour corrected using Raya Pro’s Auto Colour. This cooled the strong warm cast from the ND filter. I added some extra greens to the shadows with a Color Balance layer. I dodge the highlights on the side of the mountain to boost the effect of the sun ray coming through.
I softened the contrast, as I’ve done in the last couple of images, to deepen the mood. I did this by bringing the midtones down in a Curves layer, and then applying a Darks 5 luminosity mask from Raya Pro to a Curves layer and bringing the shadows up.
This tends to give the image a closer feel, and since there is less contrast throughout the scene to distract the viewer, their eyes are immediately drawn to the brightest light source – in this case, the sunset. You can see this same effect applied to my image next week of McLean Falls.
I created a soft Orton Effect by using Raya Pro’s Orton Effect Bright. I added some very subtle light bleeding around the sunset are. You can see how to do this here: Quick Photoshop Secrets 14: Light Bleeding For Warmer Images.
I cloned out the boats to right. And to the left, they are due to film a Hollywood sci-fi movie here, so they’ve created a very cool, futuristic spaceship-docking-bay-type-thing. While it is interesting to look at, it didn’t belong in my scene so I cloned that out too.
And I finished by creating a custom vignette that you can learn to do here: Quick Photoshop Secrets 9: Awesome Vignette For a Moodier Scene.
Finally, the image was sharpened and resized using my free sharpening tools, which you can download here: Quick Photoshop Secrets 16: Perfect Sharpening & Resize for the Web
As always, I hope you found this useful.
Jimmy

Share this:

This entry was posted on Monday, April 4th, 2016 at 2:18 pm
You can follow any responses to this entry through the RSS 2.0 feed.
This is my favorite image of yours! How do you meter and decide how long to expose for while using your 10-Stop ND filter? I have a 9-Stop and have difficulty since the camera can’t meter through the dark filter. I have an iPhone App that calculates how long to expose based on f-stop and filter density but I find it to be a bit cumbersome. I’ve gotten good at guessing though!
Thanks Brad. I wrote an article on this that you might find useful: http://www.shutterevolve.com/how-to-perfectly-expose-for-any-area-when-using-nd-filters/
At first I used an app, but now, since I shoot at pretty much the same time and light levels each day, I have a good feel for how long it should take to get a good exposure. So I don’t really use the app anymore now.
Great image and write up as ever but I’m surprised you use screw on filters. However knowing that you do how about investing in a set of Xume Adapeters which are ultra thin magnets. One on the lens, one on the filter and suddenly the screw on becomes a snap on.
I have a set for my B&W screw on.
What a fantastic idea! Why haven’t I ever heard of these? I order a set and can’t wait to try them out.
Thank you kindly for recommendation. I will definitely look into that. I’ve used a few filters before but I love the B+W range so I put up with the inconvenience of screwing them on each time 🙂
Wonderful image, but I wonder why did you use f22 for the dark one? Wasn’t the sharpness of the photo affected by this?
Hi there,
I decided that 2 minutes was the right amount of time to
capture the soft cloud movement but still retain textures. The longer
the exposure the less texture we have sometimes. In order to stretch the
darker exposure out, I had to use a smaller aperture. I’m happy doing
this with these lenses because they are superb. There didn’t seem to be
any additional CA and the images came out nice and sharp:)
Greatly captured and processed.
FANTASTIC IMAGE! I stand in awe. Really. Thank you so much for sharing your methods. I have been following you for a while and understand what you have done here, but I probably wouldn’t have been able to do this myself. I am trying though. I hope one day to create an image such as this one.
I think this would be wonderful printed on metal.
Also I checked out the link to the XUME filter holder one of your other posters mentioned. I ordered a set for myself. What a great idea! I would really have helped me out today. I can’t wait to try them out. I hope they don’t vignette with my 16mm.
Awesome work, thanks for sharing! Got one question: Why did you choose exactly those aperture settings for the two shots? Why f/11 and f/22? I’m just trying to understand, cause I always try to stay at f/8 – f/11 and only change the exposure time. I guess you didn’t want to expand the exposure time much more and so you chose to change the aperture? Just asking out of curiosity, to learn. 😉 Maybe you can help me here.
Hi Sascha,
I decided that 2 minutes was the right amount of time to capture the soft cloud movement but still retain textures. The longer the exposure the less texture we have sometimes. In order to stretch the darker exposure out, I had to use a smaller aperture. I’m happy doing this with these lenses because they are superb. There didn’t seem to be any additional CA and the images came out nice and sharp:)
Been there so many times and yet to see such a wonderful sunset, awesome work and lucky you Jimmy, thanks for sharing…
Lovely image, Jimmy. Really nicely done and I love the commentary. It’s nice to see that you’re human too :-). I also use the B+W 10-stop and sometimes I’ve also been in situations where I’ve forgotten to lock focus before screwing the damn filter on. But, I’m lazy and resort to setting the hyper focal distance on the lens and that works a treat for me (as long as I’ve composed first – of course). As for timers and calculating time value… yes, once you get used to it, you get a feel for the time required. I have never found the calculators to be accurate anyway.
A truly majestic image, Jimmy. Well done. When reading your story it reminded me of dreams I have had about seeing light like this and not having my camera. Then, when I finally get my camera set up the shot is gone. I can’t tell you how many times I’ve had this dream/nightmare. No joke, I really do dream this.
Believe me, I can truly empathize with you 🙂
Great photos Jimmy. It is really good seeing scenes from ones own country. It confirms that we have everything (except maybe knowledge) to take very similar photos. VERY inspiring.
Great shot. Your patience is humbling 😉 When you get to Picton [for the ferry] – check in to E-Ko Tours at the quay. I’m a shareholder so they’ll be nice to you if you want to get out on the Queen Charlotte Sound [and you should].
If you are in the area for a couple of days you might want to check out Cloudy Bay just round the coast. If you set up before dawn you get some very interesting monochromatic landscapes due to the black sand and grey pebbles that might appeal to you.
That’s awesome. Thank you for the kind offer. Sadly we won’t make it that way this time but I’d gladly take you up on it next time 🙂
This is a superb image. I keep hitting this site every few days to have a look at it. Captivating.