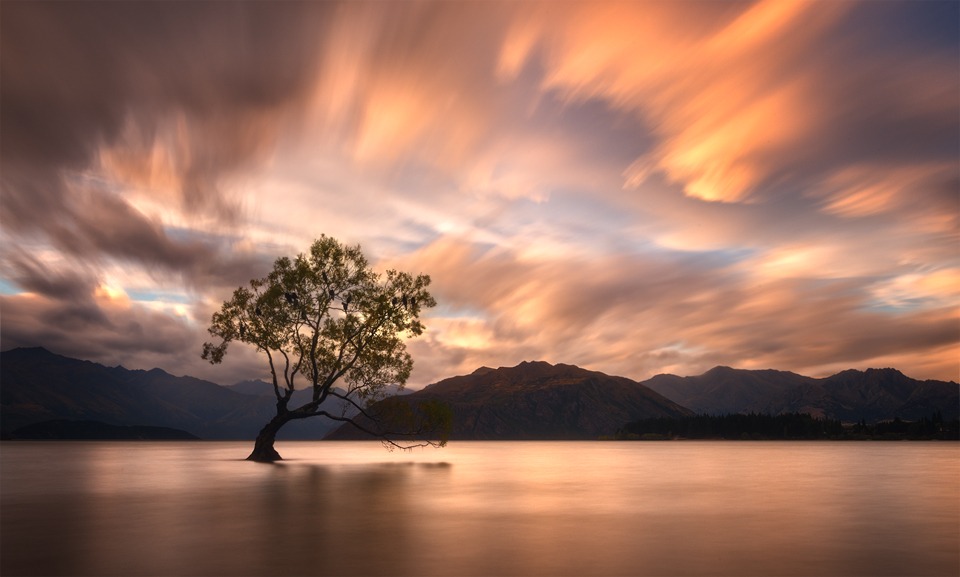
That Wanaka Tree
The Most Photographed Tree in the World?
We went to the beautiful town of Wanaka for 2 days, not to take photos, but to see my wife’s brother who has been living there for years. I’ve never really been interested in taking photos of the Wanaka tree. I’ve seen some very nice images of it, but for some reason the location just didn’t excite me much.
 But since I am a photographer, and I’m sure you’ll understand this, I couldn’t say no to at least visiting the tree and taking a quick shot or two.
That ‘quick shot’ actually turned into an hour of shooting. I placed my camera down, composed the shot, and kept my camera still for an hour, switching between short exposures and long exposures.
When the clouds started moving quickly, and separating from the rest of the pack, the scene suddenly shifted from okay, to very interesting, especially with my 10-stop ND attached.
In the end I was genuinely surprised that I came away with an image I enjoyed.
I also had the pleasant surprise of being recognised by one of my newsletter subscribers, Marco Grassi. It’s great to be able to meet some people I’m connected to. My email list is now at around 70,000 subscribers, and being able to actually meet some of these people gives me a real appreciation for how many talented photographers I have the good fortune to be connected to.
Anyway, I’m glad I went to shoot the tree. I know some photographers worry that a location has been over-shot. But personally, I think that just because a location is popular with photographers doesn’t mean you shouldn’t enjoy the experience of shooting it too. And, in the process, add a beautiful image or two to your portfolio.
________________________________________________________
How I Created The Image – Before/After Post-Processing
The Cool Bits -Technical Info
Processing Time: 30 minutes
Exposure Blending method: Apply Image in Raya Pro
No. of Exposures: 3 (2 long exposures + short Exposure).
EV Range: N/A
Aperture: f/22 (long exposures) & f/11 (short exposure)
ISO: 100
Focal Length: 36mm
Lens: Nikon 24-70 f/2.8
Camera: Nikon D800
Plugins: Nik Color Efex
Luminosity Masks: used to create softer shadows and select the tree
Workflow Explanation – That Wanaka Tree
This image was created using Raya Pro – The Photoshop Plugin.
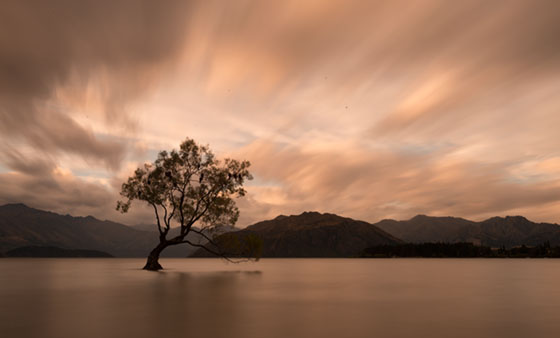
This image is made up of 3 exposures – two long exposures and a short exposure. Most of the image comes from one 88 second, long exposure. The colourful clouds in the top right of the image come from a long exposure shot shot a little bit later as sun the was setting. This was 335 seconds long. Since the tree was moving a lot in these long exposures, and therefore blurry, I blended in a short exposure where the tree was nice and sharp.
To blend the long exposures it was a simple case of matching their exposures and simply painting in the cloud to the top right. However, the B+W 10-stop ND filter leaves a fairly strong pink colour cast, which I quite enjoy. The short exposure didn’t have this warm cast. I could have corrected the warm cast in the long exposures to match that of the short exposure, but I wanted to keep some of that pink cast in the final image.
Instead I matched the colour of the short exposure with that of the long exposure blend by using the 4th teachnique you see in this colour correction video: Photoshop Secrets 17: 5 Ways To Color Correct Beautifully (Even Remove Strong Casts). Once the colours and brightness were matched, I created a manual luminosity mask using Raya Pro’s Manual function and made an accurate selection of just the tree in the short exposure. Then I shifted the edge of the selection outwards, and feathered it. I used this selection to blend in the tree from the short exposure. Then I cleaned around the edges of the tree and made small brightness adjustments.
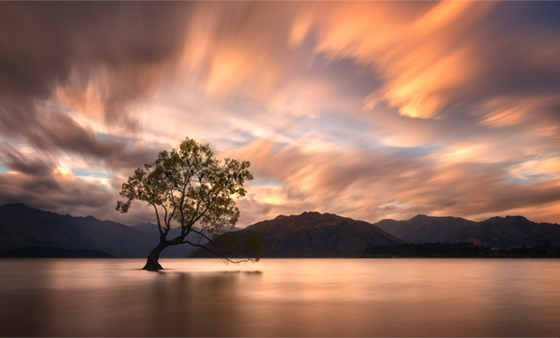
From then on I corrected the colour significantly using the ACR method in the video above. I really wanted to restore some of the blue sky, while retaining some of that warm pink cast.
I used Nik Color Efex’s Tonal Contrast to add some dynamic local contrast throughout the image. And I added a few contrast adjustments to stretch the histogram somewhat. I pulled down the midtones dramatically with a Curves layer to create a deeper mood. I then used a Darks 5 luminosity mask from Raya Pro to pull up and soften the shadows slightly.
Shooting at f/22 meant that every little bit of sensor/lens dirt showed up in the picture. I used the Sensor Dust function in Raya Pro to reveal and then remove these pesky marks.
To soften and deepen the mood a little bit more, I created an Orton Effect layer using Orton Effect Bright in Raya Pro. And I finished by creating a custom vignette that you can learn to do here: Quick Photoshop Secrets 9: Awesome Vignette For a Moodier Scene.
Finally, the image was sharpened and resized using my free sharpening tools, which you can download here: Quick Photoshop Secrets 16: Perfect Sharpening & Resize for the Web
As always, I hope you found this useful.
Jimmy

Share this:

This entry was posted on Wednesday, March 23rd, 2016 at 5:30 pm
You can follow any responses to this entry through the RSS 2.0 feed.
Great image, Jimmy. How did you blend a moving tree with the long exposure? Wouldn’t you be able to tell where the short exposured clouds meet the tree line and the long expiate clouds? I’ve always wondered this and it’s what I struggle with the most.
Thanks Brad. As I mentioned in the description, it was just a case of matching colour and brightness, and I was fortunate that the short exposure textures around the tree weren’t a million miles away from the cloud textures in the long exposure 🙂
That’s the problem I always have when trying to match up a short exposure with a long one! I’ll try the color matching method you described above. Thanks!
same here! always trying finding a way to solve this, since i believe we are both interested in the moving clouds but not blurred trees or other plants…
Lovely image Jimmy!
Thank you for the Easy Panel, really loved it. I have been exploring the videos of Raya Pro, but could not find anything equivalent to “Details Enhancement” and “Sharpen Full” of Easy Panel in Raya Pro! Are those features not included or those are present in other names?
Thanks! Yeah, there are actually two detail enhancers in Raya Pro. They’re called Detail Enhance 1 and Detail Enhance 2. Sharpen Full Size is also included in the ‘Finish’ section of Raya Pro. I hope that helps.
Take care
Jimmy
Thanks a lot for replying! I think I must have seen videos featuring older versions, which might be missing these features. Anyways, here are two photos that have created with Easy Panel:
https://500px.com/photo/147133969/punakha-dzong-fortress-of-bhutan-copy-space-by-srijan-roy-choudhury
https://500px.com/photo/142907711/landscape-of-bhutan-haa-or-ha-valley-copy-space-by-srijan-roy-choudhury
Another atmospheric image that works beautifully. You’ve blended the shorter exposure of tree so well with the longer one. Now that’s what I need to do more. 🙂
hey Jimmy, a question that have always bothered me that, for the short exposure you shot, was it for the tree so it is not blurry moving in the wind? And how do you blend that smoothly in with other 2 longer exposure which have trees being blurred by the wind? Should I use “blend if” in blending options? coz general luminosity mask selection would not work here because the blurred and the still trees in two exposure having the same luminosity level. Thanks if you can answear this for me