
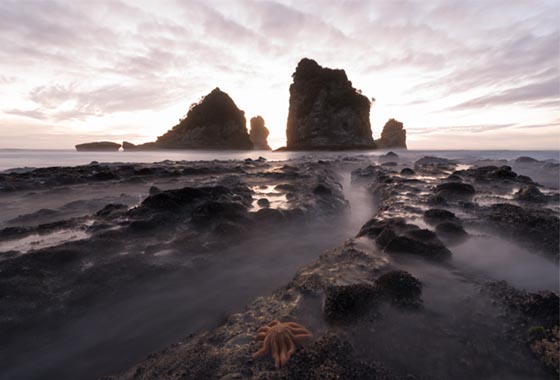
Sunset at Motukiekie Beach
Taking a Dangerous Risk
This wonderful location is one of the main reasons I came to New Zealand. For years I’ve wanted to capture a dynamic seascape with those lovely starfish (I’m not sure if these are starfish, so apologies if I’m wrong), and water cutting through the narrow gullies.
It took 7 days for the conditions to be right, for the tide to recede enough, and for the sky/light to become favourable. This sunset lasted a huge 5 minutes, and I managed just one photo – this one, and I took a big, irresponsible risk in getting it.
Friday, Saturday and Sunday would have been prime shooting on Mutkiekie beach. The tide was just right on these three days. The weather, however, wasn’t in the mood to help a photographer out.
On Sunday, although the sunset was non-existent, the blue hour was workable. Another photographer was already there when I arrived, by the name of Luke. And as chance would have it, he is a Raya Pro user! Sadly there wasn’t time to chat though. And although the light wasn’t great, I have one image from right inside one of these tight little gullies that I may publish later.
Monday night was my final chance this month to shoot this location, but it was touch and go. The tide needs to recede a lot in order for these rocks to appear. On Monday, however, as the sun was setting nicely with 30 minutes to go until sunset, the tide simply wasn’t receding enough.
I stood waste high inching my way towards these rocks every few minutes. And every few seconds large wave after large wave crashed against and over the rocks. The light was beautiful and all I could do was watch. I could have tried my hand with a different composition but I’d travelled to New Zealand for this specific shot.
Ten minutes before sunset I was about 7 meters away from the first rock, as its head began to pop out of the water. The beginning of these rocks are about waist height. It took another 15 minutes before the powerful waves became less frequent and I inched my way slightly closer to the rock. By this point the sun had sank 5 minutes ago and I was starting to get a bit desperate.
I should point out here that I don’t think we should risk our lives for a photo. To do so would be irresponsible, so I’m not encouraging any reckless behaviour here.
I waited until the very last minute to climb onto the rocks, until I was fairly confident I would be safe. Having said that, when it comes to big waves we are always taking a risk. Nevertheless, I pulled myself up onto the rock, tripod in hand. The waves came crashing almost instantly. I thought I’d made a big mistake. But for a minute or so they calmed slightly. Knowing there were literally minutes left before the light would bid me goodnight, I jumped from rock to rock looking for a composition.
I spotted a little starfish sitting nicely on the edge of a gully. The composition I could build around this allowed me to point directly towards the beautiful light and sea stacks, while water cut through the scene, and lead towards the sunset.
I set up the camera and fired off a set of brackets. As soon as the brackets finished, a wave came bowling towards me. I grabbed the tripod and steadied myself. Once it passed I attempted more compositions but the strong waves kept knocking my tripod and the light was seriously fading.
Within minutes the colours had faded and night time started to make an introduction. Given that the surface of these rocks were so uneven, the tide so unpredictable, and the light drastically disappearing, I started to feel very vulnerable. All it would take was one violent wave and I would be in trouble. I decided to bank what I had and leave. I scrambled down the rocks and plodded my way back to the beach, wiping off some blood on my legs, from a cut I don’t remember getting.
I came out of the situation fine, but I have no idea what I was thinking, looking back now. It was senseless, really and I’m not so sure I would act the same way if faced with a similar situation in the future.
From what I can see, I came away with just this image. But as sheer good luck would have it, this is exactly what I was looking for. I had planned to come back in April, and then May if I still hadn’t go the shot. But I got very fortunate on Monday and can now call an end to the 7-day wait at Motukiekie.
________________________________________________________
How I Created The Image – Before/After Post-Processing

The Cool Bits -Technical Info
Processing Time: 30 minutes
Exposure Blending method: Apply Image in Raya Pro
No. of Exposures: 2
EV Range: -1, 2
Aperture: f/13
ISO: 100
Focal Length: 14mm
Lens: Nikon 14-24 f/2.8
Camera: Nikon D800
Plugins: Nik Color Efex
Luminosity Masks: used to create softer shadows
Workflow Explanation – Motukiekie Sunset
This image was created using Raya Pro – The Photoshop Plugin.
Using Apply Image in Raya Pro, I quickly blended the two exposures that went into this image. I refined the mask created by Apply Image by dodging directly onto it (if you followed my Mastering Raya Pro course, this is the same process I used in the Advanced Secrets videos).
I added a Curves layer as clipping mask to the darker exposure to add some lovely contrast to the sky. You can see an example of this in The Importance of Triple/Double Processing in Photoshop & Exposure Blending
Once blended, I added some warm colours to the scene with a simple Hue/Saturation layer. I decided to add some local contrast selectively by using the Tonal Contrast filter in Nik Color Efex. I slid Shadows down to ‘0’ and moved Highlights and Midtones to ’10’. This give me some nice added contrast.
I dodged along the water which cuts through the image, just to brighten it up. I also dodged other parts of the foreground to brighten them up and add a touch of colour.
I added a very soft Orton Effect from Raya Pro just to the foreground. Then I created a curves layer and brought the midtones right down to really darken the mood and create a ‘closer’ feel. I softened the shadows by adding a Darks 4 luminosity mask from Raya Pro to a curves layer and pulling the curve up.
I painted some soft colours into the sunset using this light bleeding method: Quick Photoshop Secrets 14: Light Bleeding For Warmer Images
I finished by creating a custom vignette that you can learn to do here: Quick Photoshop Secrets 9: Awesome Vignette For a Moodier Scene.
Finally, the image was sharpened and resized using my free sharpening tools, which you can download here: Quick Photoshop Secrets 16: Perfect Sharpening & Resize for the Web
As always, I hope you found this useful.
Jimmy

Share this:

This entry was posted on Tuesday, March 15th, 2016 at 4:31 pm
You can follow any responses to this entry through the RSS 2.0 feed.
Beautiful work and great story of it’s capture. Glad you came out unharmed.
beautiful image. and thank you very much for sharing the processing work you do. i am looking forward to using raya.
Great Image Jimmy, How long was the exposure time, since you said on the previous photo you don’t use ND filters for that 14-24 lens I wonder how long was the exposure time for both shots, Thanks!
Hi Andy. The exposure time for the base image (which contained the water) was 13 seconds long. For the sky it was 1.6 seconds 🙂
Stunning image Jimmy and a great story to it as well which makes it just that little bit more beautiful no doubt! Coming to landscapes from wildlife photography It has amazed me how much more work and, often, danger is involved – especially with seascapes. Cracking image and 10/10 for dedication.
Wonderful image and crazy story! I was wondering how you chose the EV values that you used? When I set up my brackets on my D7000 I usually have a 3 bracket set up programmed to either 1 or 2 stops apart for the series. I guess I’m having trouble on understanding how to set up my bracketing correctly so I can blend them better in Raya
Welcome to New Zealand, thanks for the reminder that i need to get out and photograph my own country. Sorry that the weather has been particularly bad this last week 😯
Awesome tutorial and advice as usual.
Love the image. The Maori name for the starfish is Pātangaroa. Pity the weather didn’t hold for you. We Coasters have learned to live with taking photos in 3 times the average rainfall of the Amazon basin. There is so much more to see on the Coast Jimmy. Do come back.