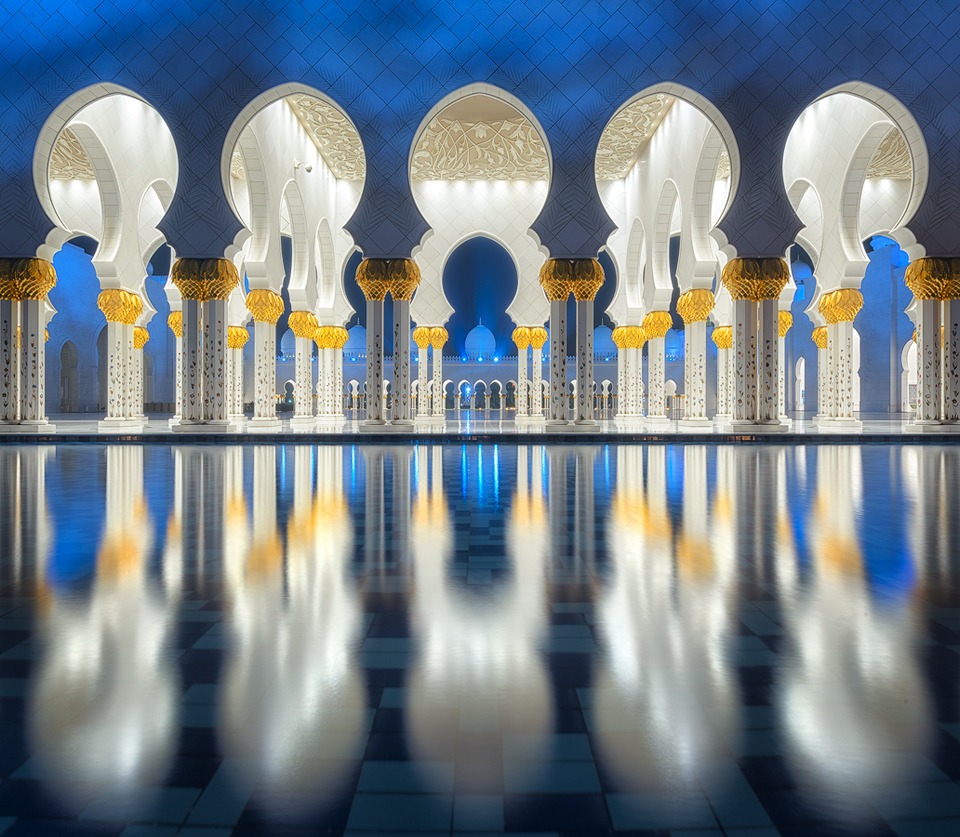
Clear Mosque Reflections
The Power of The Korean Ajumma
Ajumma, in Korean, translates as a lady of marriage age. However, we Westerners living in Korea use this term to incorrectly refer to a special breed of lady who strikes both fear and joy in our hearts – little old grandmothers.
Old Korean ladies are fierce, and I love them. While the US has Chuck Norris, we have ajummas. Chuck would run a mile if he ever came face-to-face with an ajumma.
They may look small and frail, but they know how to give a punch. I know because I’ve been rib-shot twice by ajummas who wanted to pass me in the street. I showed no outside appearance of pain upon impact, so that my pride may remain intact, but on both occasions I was doing an inside cry.
Ajummas wait for no man and live by their own rules. In an elevator once, I was coming home with a shopping bag in my hand. An ajumma saw the foreigner, saw the bag, wanted know what the foreigner had in the bag, opened the bag, looked around, closed the bag, smiled, looked away, curiousity satisfied.
These old ladies, or many of them at least, survived the Korean war. They’ve seen it all, drank it all, punched it all. One does not argue with an ajumma, unless one also has an ajumma who “got yo’ back”.
In the West we supposedly have an ‘out of control youth’. In Korea, it’s ajummas that people fear. On hiking trails there are signs telling people not to blast music from their phones, in case they disturb others. This is not aimed at the youth. The ajummas know how to use phones, and how to turn the volume up when their favourite tune comes on. Screw the signs!
In 3 years here, I’ve never heard a young Korean back-chat an ajumma. They value their heads and eyes too much to have them ripped out/knocked off.
Once on a crammed bus, I was standing up, holding onto a rail, which others were also holding onto. An ajumma stood next to me and placed her hand over mine, fingers interlocked, sweaty. She saw the fear in me and smiled – she was showing me that I was her b1tch, and it was true.
I’m going to miss these straight-talking, straight-acting old ladies. Their no-nonsense attitude is a breath of fresh air. I may not miss their occasional rib-shot.
________________________________________________________
How I Created The Image – Before/After Post-Processing

The Cool Bits – Technical Info
Processing Time: 30 minutes
Exposure Blending method: Rapid Blend If
No. of Exposures: 3 x 2 (explained in workflow)
EV Range: -1, 0, +2
Aperture: f/13 & f/20
ISO: 100
Focal Length: 18mm
Lens: Nikkor 14-24mm f/2.8
Camera: Nikon D800
Plugins: Nik Color Efex for Pro Contrast and Detail Extractor
Luminosity Masks: Brights 4 to protect highlights
Workflow Explanation – Clear Mosque Reflections
Would you like to learn my post-processing techniques? Feel free to check out my course: The Art of Digital Blending & The Art of Cityscape Photography
This image is composed of two sets of 3 exposures. One set is made up of long exposures shot at f/20. The other set was shot at f/13, for shorter exposures.
There are two sets of each exposure for a few reasons.
Firstly, I had to shoot longer exposures to create the smooth water texture, which made the reflection crisper.
Secondly there were people throughout the image, and a longer exposure helped to blur them out.
Since the set of long exposures had smooth water, and no tourists, you might be wondering why I used the second set of quicker exposures.
Essentially, the exposures shot at f/13 were significantly sharper, and had no sensor dust spots, unlike the long exposure set which were covered in dust spots.
In post-processing, I moved the temperature slider in ACR extremely far to the left. This emphasised the blue walls, and blue hour sky, while whitening the interior of the arches, which I preferred to the beige/blue combination in the original exposure.
 In Photoshop I layered each image from the shorter exposure set on top of its corresponding exposure in the longer exposure set. For example, the 0 exposure from the f/13 set of exposures was placed on top of the same exposure from the f/20 set. I added a white mask to the f/13 exposure, and wherever I saw a tourist, I painted in the exposure below (which was tourist free) with a black brush, thus removing the tourists.
Once all tourists were removed I chose the Rectangular Marquee tool and drew a rectangle from the beginning of the water near the arches, right to the bottom of the image. This made a full selection of the water in the f/13 exposure. With this selection active, and the mask of the f/13 layer selected, I pressed delete, which removed this entire area from the f/13 layer, leaving the smoother water from the f/20 layer below it.
I repeated the same process for the other 2 exposures in the f/13 set, and their corresponding exposures in the f/20 set.
I then saved the workflow up to this point workflow as a PSD. I merged each of f/13 exposures with their corresponding f/20 exposure.
When I’d finished, I had 3 exposures which were sharp, free of sensor dust and tourists, and with a clean, smooth reflection. Blending these exposures took a few seconds using the Rapid Blend If technique I use in my Art of Cityscape course.
With the blended image, I added a little bit of contrast with a Levels layer. I then opened up Nik Color Efex and added some Dynamic Contrast, to make the scene pop a little bit, and also a gentle Detail Extractor layer, to bring out the details on the walls above the arches, the golden yellow ornaments, and the pattern in the ceiling at the centre of the image.
I then added a very gentle Orton Effect (about 10% opacity) from my Easy Panel, to give the image a softer glow. To bring out the golden yellows I opened a Hue/Saturation layer, and increased the saturation of the Yellows slider. This increased the subtle yellow of the walls of the interior, which I didn’t want.
I inverted the mask of the Hue/Saturation layer (Ctrl+I or Command+I), which made it invisible, and I painted in the added saturation of the yellows manually.
I added a final Levels layer to give the midtones and some of the highlights in the image a big boost. To protect the stronger highlights I used a Brights 4 luminosity mask to make an accurate selection of these areas, and then painted them out of the Levels adjustment.
Finally, using an Elliptical Marquee tool, I created a nice round selection (300 feather), inverted the selection so that only the outsides of the image were selected and opened up a Curves layer. I brought the midway point of the line down slightly, which gave a nice, natural vignette around the building to the top, and the water at the bottom, concentrating the eye on the arches.

Share this:

Tags: Mosuque
This entry was posted on Wednesday, April 22nd, 2015 at 2:28 pm
You can follow any responses to this entry through the RSS 2.0 feed.
Great Image and totorial, Thanks!, would love to see this in a video explaining the workflow
Stunning, Jimmy – simply stunning!
Thanks DaniLew!