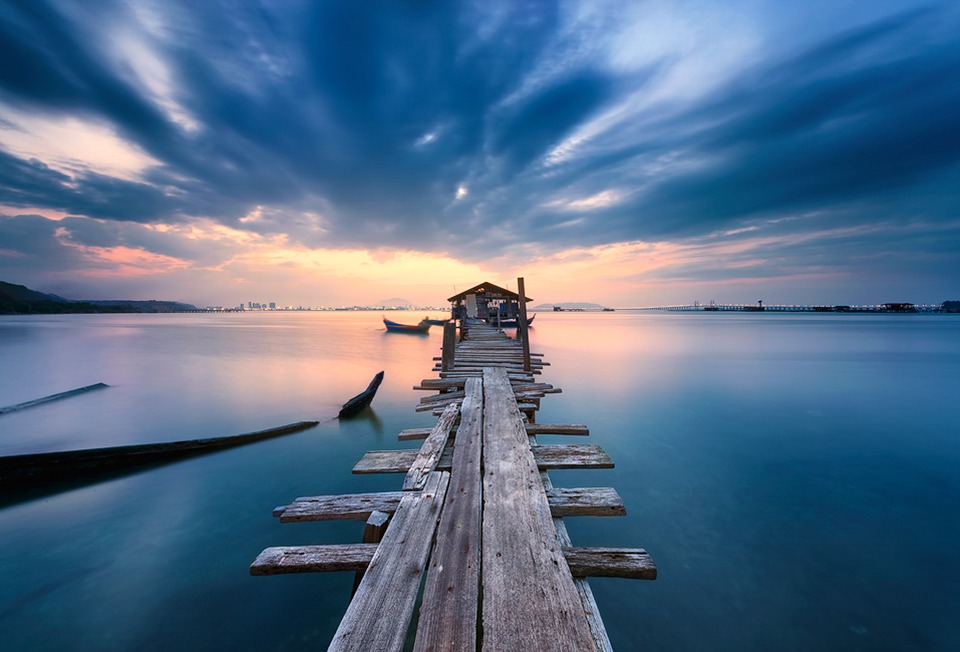
Some Jetties Aren’t Meant To Be Straight
The Easy Panel is Back
Please note: if you downloaded the Easy Panel early last week, we recommend you download and install it again. It was updated on Friday as some photographers had complained that the luminosity masks were generating very slowly. It is now up-to-speed and with some extra installation instructions!
I’m thrilled to announce the release of the new Easy Panel, which is free to download. If you’re an email subscriber already, please check your emails for a link to the download.
If you want to download the Easy Panel, simply sign up to my weekly photography newsletter and you will receive the download link to the panel immediately.
You can sign-up here: Easy Panel For Photoshop
The Cool Bits – Technical Info
Processing Time: 40 minutes
Exposure Blending method: Rapid Blend If
No. of Exposures: 2
EV Range: +1.7 & -0.3
Aperture: f/22
ISO: 100
Focal Length: 14mm
Lens: Nikkor 14-24mm f/2.8
Camera: Nikon D800
Plugins: Nik Color Efex
Luminosity Masks: Used to protect the shadows
Workflow Explanation – Dove Jetty, Penang
To learn my post-processing techniques, feel free to check out my courses: The Art of Digital Blending & The Art of Cityscape Photography
Unlike my last image with the birds flying at the Batu Caves, I used a lot of artistic license here, rather than keeping it natural.
This was shot at the end of blue hour and the beginning of sunrise. It was dark enough to create a 30 second shutter speed without an ND filter, and the clam water made for the ideal texture. By ‘ideal’, I mean it looks as smooth as ice, which contrasts perfectly with the wooden texture of the jetty.
Making the shot wasn’t easy. The wooden slats are loose, and the jetty unsteady. With each shot I had to breath lightly and try not to move a muscle. It took a few attempts to make the shot.
 I chose a low composition so that we can almost feel that wooden texture, we are that close. And I went extremely wide to distort the length of the foreground, again giving more emphasis to the wooden jetty. The building at the end had some bright blue objects and bits of plastic dotted about, which I didn’t want in the frame. This wider focal distance pushed the building further out, minimising those distractions.
The final image is composed of 2 exposures, a darker one for the sky and one for everything else. Although the shape of the clouds looks like it was the product of a long exposure, surprisingly it isn’t. The clouds were actually shaped that way. They were moving from right to left, rather than towards me.
Even though I placed a lot of emphasis on the jetty, in the end, it is the sky that gives the image its mood. The cloud, which is almost like a sinister claw, dominates the image, while the promise of the sun breaking through behind is somewhat uplifting.
This whole image, for me, is one of contrast. The smooth water contrasts with the grainy wood; the sinister clouds contrast with the promise of sun; the cold blue contrasts with the warmer beige; and even more subtly, the large modern buildings and bridge on the horizon contrast with the old wooden structure in front of us.
As for processing, I used the Rapid Blend If Technique to blend the two exposures easily. However, while the darker exposure did a wonderful job of restoring the sky, it also darkened the sea too much. So I created a Gradient mask on the darker layer, which removed this exposure in a smooth, natural way.
I was now left with a very flat image. I used Nik Color Efex’s Pro Contrast filter to bring it to life, and give more dynamism to both the clouds and the sky.
To emphasise the area of the sun more, I created a new layer, chose a beige colour, a large, soft brush, and painted around that area of the sky and water. I then changed the Blend mode of this new layer to Screen, and dropped the opacity down to 15%. Screen Blend mode brightens areas, but the beige colour also gave the area extra warmth.
I ran Nik Color Efex’s Detail Extractor and applied it only to the jetty, to emphasise the wood some more. Then I created a Color Balance layer, and added more yellows to the scene. I then applied this only to the jetty by manually painting on the mask. This restored some natural brown colour to the wood, which previously had a strong blue colour cast.
Back in Nik Color Efex, I used the Darken/Lighten filter to draw the eye towards the centre of the image, and give the outside edges a soft vignette.
I then spent 15 minutes (this is why the image took 40 mins to prepare), cleaning around 80 sensor dust spots off my image. After three weeks of constant use in many different conditions, my camera had clearly been collecting a lot of dust. An aperture of f/22 showed me how desperately I needed to service my camera when I got back.
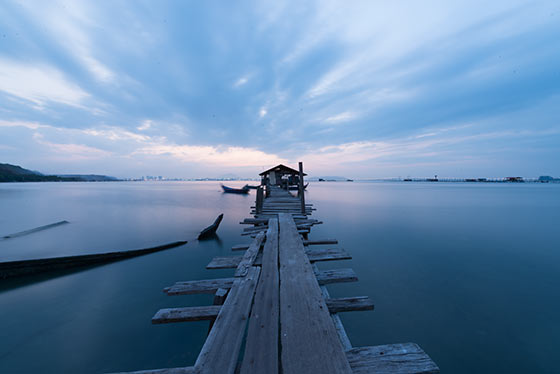
After I’d finished, one thing was bugging me. The jetty isn’t straight. In fact it’s completely crooked. In the ‘before’ image, you can see exactly what I’m talking about. I had considered leaving this the way it was as it was the natural character of the bridge. However, it niggled at me every time I looked at it.
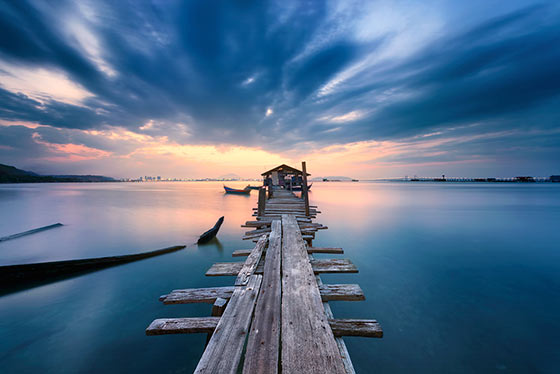
So, using the Puppet Warp tool, I dragged the bottom slats out of view and by default, straightened the other slats a little bit. Maybe it’s a touch of OCD but I felt much happier about this change.
Before/After slider

Share this:

This entry was posted on Monday, March 9th, 2015 at 9:43 am
You can follow any responses to this entry through the RSS 2.0 feed.
Dear Jimmy, what a powerful image. Very well done!! And Thank you so much for being kind and humble enough to share your knowledge with enthusiasts like me. I came accross your websites a few months ago and since then been constantly following and reading your articles. These are more than valuable materials and you cannot imagine how much I’m learning! thanks a lot for you time and willigness to help and inspire people. I pray you keep being this outstanding yet humble photographer. God bless you, brother. Your student and fan from Brazil, Jonas
Hi Jonas, thank you for the great comment. It’s always great to hear when someone finds the workflow explanations in my images useful. I have a lot of plans to extend the educational content of both of my sites this year. I hope these new additions also help you in your photography.
Have a great day!
Jimm
Thanks again, Jimmy! i wish you every blessing in your plans to extend the educational content. That will be a real blessing for millions of photographers worldwide. Keep shining, brother!
Jimmy this is awesome. You had been a great inspiration for beginners to bring a rapid change in the photographers getting into advanced photography.
Thank you for the kind words Sudhir 😀
Hi Jimmy,
Thanks for all your efforts in creating and modifying the easy panel and for sharing with us. Unfortunately, the extension manager was not playing and despite updating, I then tried the manual installation. My problem there though was the final file was not there as described.
“4.- You will now see the folder name ‘com.shutterevolve.easypanel’. Copy this folder into…
Just a list of further files none of which were named above though I checked each one. The top file which was unnamed brought me full circle to the .zip folder again.
warmest regards,
Diane
Hi Diane,
Basically the contents of the com.shutterevolve.easypanel.zip file are what need to be copied manually. So if you create a file called ‘Easy Panel’ and copy the contents in there, that will be all you’ll need.
However, so far every person who has had this difficulty has been able to resolve it by re-installing Photoshop. You can see a few these on this Facebook thread towards the end of the comments: https://www.facebook.com/photo.php?fbid=10152767998310980&set=a.10150425916060980.352180.697500979&type=1&theater
If that is too extreme, all of the actions for the panel are also included and will be very easy to install and use.
Thank you
Jimmy
Thanks Jimmy. I had the actions already installed but the easy panel seemed a pretty cool tool.
Hi Jimmy, great minds think alike – I took this shot (https://www.flickr.com/photos/kristianbell/10434557375/) of a wooden jetty near to your jetty a few years ago. Nothing like as natural a shot as you have managed despite the knowledge your tutorials have provided me, though I strive to improve. Thanks for the tutorials.
Great photo. I love the angle!
Just stumbled across your website/ pictures/ how-to’s. What a wonderful resource. Thank you very much for sharing. I look forward to learning a lot from you.
Thank you very much Maritan!
Jimmy, his absolutely awesome. Heard about this panel, however I use Lightroom and Photoshop Elements 10. Can I add this to either progam?
Hi there,
Sadly this is only compatible with full Photoshop.
Hi Jimmy!
Stuff like this is fantastic. Until relatively recently I’d been seeing these awesome photographs captured by professional photographers and had been trying to achieve the same effect with one perfectly exposed image straight out of the camera. Until realising, of course, that that’s not how you do it! 😀 It’s great to see the workflow other photographers use, and articles like this push home the idea, for amateur photographers everywhere, that a great image really comes from the work you put in post-processing as much as taking the image in the first place. <3
I’m glad you’ve found my blog useful. In an ideal world we would take a shot and it would be beautiful in-camera, every time. And some photogs manage that more than others. But I take great pleasure in post-processing. As you say, the image you get is often directly related to the time and effort you put into planning, shooting and processing. The greater care we take, the cleaner the final image.
Thank you for the comment!