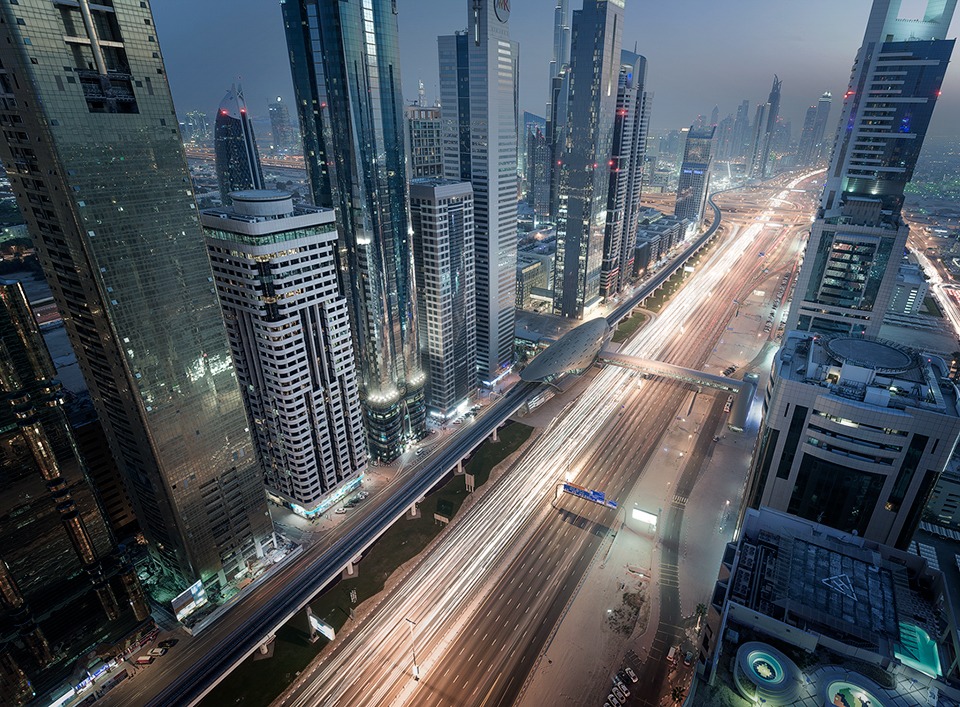
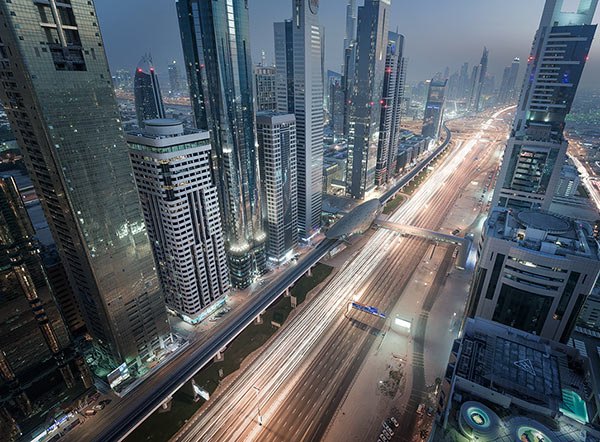
Futuristic Tron Cityscape
Leaving Singapore for Melacca
This morning I began the third and final leg of my photography trip, Malaysia. I’ve split with my companions and headed solo to Melacca to shoot the famous mosque here. When I arrived, my plans to scout the location were delayed slightly as the button on my pants (the crotch area), fell off.
I bought a sewing kit and spent some time learning how to sew. I tried to figure out exactly what a thimble is used for but sadly it was beyond me. I knew that it belonged on one of my fingers or thumbs.
The romantic life of travel photography…
 Singapore went by in a flash. Early wake ups and late night shooting meant that my camera had an extreme workout. Yet, in contrast to Dubai, I came out with few images I was happy with. Hopefully the weather will be kinder next time!
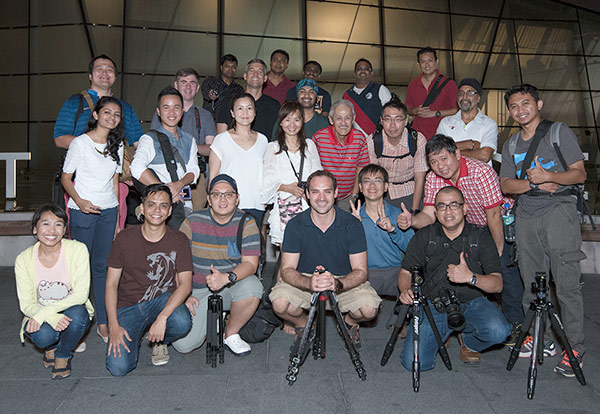
On the final night I had the pleasure of hosting a photowalk with some locals. Despite the last minute planning, and holding it on Chinese New Year, the turn out was superb. It was nice to meet so many talented photographers. The photo below was taken by Partha Roy, a good photographer-friend of mine in Singapore.
The Cool Bits – Technical Info
Processing Time: 20 minutes
Exposure Blending method: Luminosity Masks
No. of Exposures: 2
EV Range: -1 + -1
Aperture: f/11 (main exposure with light trails) & f/4.5 (darker exposure to recover the highlights)
ISO: 100
Focal Length: 18mm
Lens: Nikkor 14-24mm f/2.8
Camera: Nikon D800
Plugins: Nik Color Efex
Luminosity Masks: Used to recover selected highlights
Workflow Explanation – Tron, Futuristic Cityscape
To learn my post-processing techniques, feel free to check out my courses: The Art of Digital Blending & The Art of Cityscape Photography
My idea with this image was to go with a cold, futuristic cityscape, which was a very straightforward process.
Firstly, I imported two exposures (main exposure for light trails and buildings and a darker exposure to control the highlights) into Adobe Camera RAW. In ACR I reduced saturation to around -45. I then added a colder temperature by moving the temperature slider to the left, until the image took on that futurist feel.
With the darker exposure selected, I lowered the Highlights slightly, just to recover some blown out areas.
After opening in Photoshop, I layered the 2 exposures and added a black mask to the dark exposure. With luminosity masks, I used Brights 3 to selectively recover some of the highlights.
I cropped the image so that the roof of the tall building was close to the top right corner of the image, thus ‘closing’ the composition, so that we’re immediately drawn to the light trails.
I then used NIK Color Efex’s Pro Contrast filter to create local contrast, and brighten the buildings and foreground. I used the Elliptical marquee tool to create a vignette around the image. I then hand painted more vignette, with a new layer and a black paint brush, just in the foreground to concentrate the eye more in the centre of the image.
Finally, I used a large, soft Dodge brush to brighten the midtones at the bottom and middle of the buildings across the road. This was done to give the impression that the light trails were so bright they were illuminating the buildings nearby.
I look forward to seeing your futuristic cityscapes 😀
Before/After slider

Share this:

This entry was posted on Sunday, February 22nd, 2015 at 1:10 pm
You can follow any responses to this entry through the RSS 2.0 feed.
This is a great shot Jimmy. I spent some time reading your older posts and seeying your old photos….and honestly everything i saw just screams evolution and hard work. Keep going myt friend.
I really appreciate that man. My tastes and processes have certainly changed, and I’m glad that’s evident in the final image. Thanks for commenting!
Great image!, but I guess the images in the before/after slider are swapped as the edited colder one is in the “before” area
Thanks for letting me know Andrea!
Looks correct to me. Jimmy
I am truly stunned by your work and I am still getting ti grips with your material on luminosity mask. I will just have to save up some dollars to buy your full course because I am very determined to learn this. I am sure it will do wonders for my HDR work. Thanks for sharing with us.
Thank you kindly for the compliments. I hope you find the materials truly game-changing, as I did 😀
I want to know your whole process for getting to these rooftops. You’ve mentioned that a little money is involved but who do you approach and how do you sell the idea (other than the bribe)? You could do a whole tutorial just on how to get the location.
Hi Terry,
I don’t have any specific technique to get on rooftops. In some countries, like Singapore, it’s virtually impossible to bribe anyone, while in Dubai, bribes are the most common method. For the most part, I just try my luck and see what happens.
Hello Jimmy, really love your work & I have purchased your course. A side question … how do you make the before/after slider? Kind regards, Lynden.
Thanks Lynden! I use a before/after slider purchased on themforest/codecanyon. There are two available on that site and both work well.
Great shot, but the long delay popup ad is a turn off.