
Streaming Light Trails
Streaming Light Trails
The drizzle and cloud greeted us once more on Victoria Peak at 4.30am this morning. This time we didn’t even take our cameras out. We sat for a couple of hours and watched the city wake up. Beboy was attacked by a 5-inch stick insect. I’m not sure ‘attacked’ is the right word, but by his reaction I thought he’d been mortally wounded. With little else to do, we followed it.
I’ve learned some interesting things about my current travel companions recently. For example, Beboy can’t watch movies with too much dust in them. Yes, you read that correctly – dust.
Hong Kong has everything I love about Asian mega cities – energy, life and excitement.
The Cool Bits – Technical Info
Processing Time: 1 hour
Exposure Blending method: N/A
No. of Exposures: 11
EV Range: -3, -2, -1, 0, +2
Aperture: f/22
ISO: 100-200
Shutter Speed: From 0.77 seconds to 30 seconds
Focal Length: 14mm
Lens: Nikkor 14-24mm f/2.8
Camera: Nikon D800
Plugins: Nik Color Efex for local contrast adjustment and change of light
Luminosity Masks: Used for contrast adjustments and recovering the shadows.
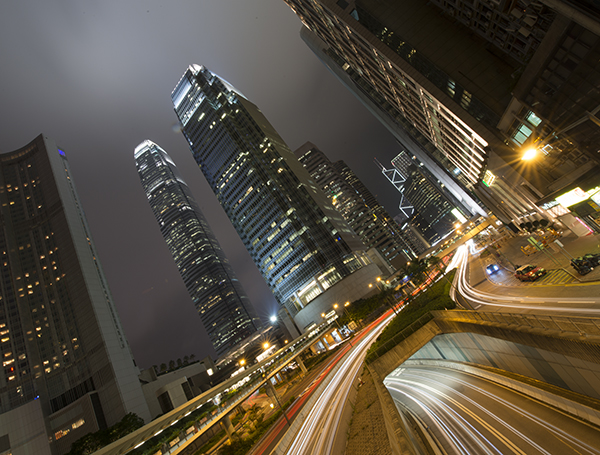
Today’s Photo – Hong Kong Skyline
This image is composed of 11 different exposures: 1 for the base exposure, 6 for the light trails, 3 to control the highlights and 1 to recover the shadows. You can learn all of the processing techniques in the Art of Cityscapes Course.
Firstly, I made some colour corrections to all files in ACR by adding some cooler tones. Then, in Photoshop, I layered all of the light trail exposures into the base exposure, using the Blend Mode Lighten. I duplicated a couple of these exposures, moving them slightly, to broaden the light trails.
To control the highlights I used the Rapid Blend If technique on 3 lower exposures. I Selectively applied these changes to the street lamps and a couple of other clipped areas. I used luminosity masks and painted in at 20% an exposure 2 stops brighter than the base exposure to recover some of the shadows.
To add more energy to the light trails I selectively applied a Levels adjustment layer. I removed some slight lens flare with the clone stamp, and added some more blue tones throughout.
In Nik Color Efex I increased local contrast with the Pro Contrast slider and created a shift in light using the Darken/Lighten Centre filter. I added another contrast adjustment, this time to the midtones using a luminosity mask.
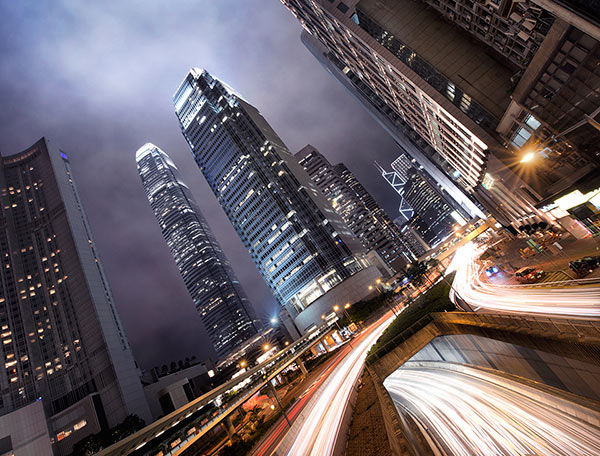
Finally, as you can see in the before image below, the sky was a little bit flat so I added some extra cloud texture, which increase overall drama. I’ll publish a tutorial on Shutter…Evolve tomorrow showing you how to do this.
Before/After Comparison

Share this:

This entry was posted on Thursday, June 12th, 2014 at 5:18 pm
You can follow any responses to this entry through the RSS 2.0 feed.
WOW!!!!! I’m not usually one for the off-kilter perspective but in this image it’s so right!!! Glorious!!!!
Thanks Lois. There’s a very small compositional window so I had to go for tilted frame to get everything I wanted in!
I think that tilt really added to the energy. Fantastic PP
Fantastic edit Jimmy! That soft contrast transition throughout this masterpiece without looking flat is really good. I also like that POV and lighttrails giving it some kind of dynamic atmosphere.
Thanks! It was exactly that kind of dynamic atmosphere I was trying to create 🙂
I love the way you gave the buildings that cold grey/blue steel feel. it adds so much to this capture. well done!
Thanks Kent. I love to add blue tones to cityscapes. It adds an interesting futuristic feel to the scene 🙂
Thanks for the updated luminosity blending tutorial. I’ve purchased the advance luminosity tutorial awhile back and didn’t quite follow. After watching the updated tutorials, everything started to click in. I don’t fee lost anymore.
I have a question. You mentioned that the EP panel will not work with the cc 2014 updated. Will this be fix or EP will no longer be supported? I like the one click button of creating and deleting the masks. Thanks.
That’s amazing! thanks so much for the information, it’s very helpful. Also, may I ask where exactly this picture was taken?