
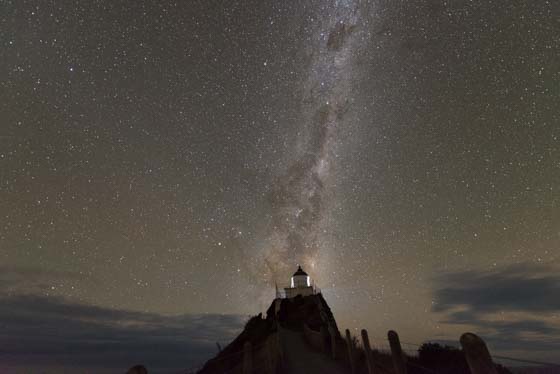
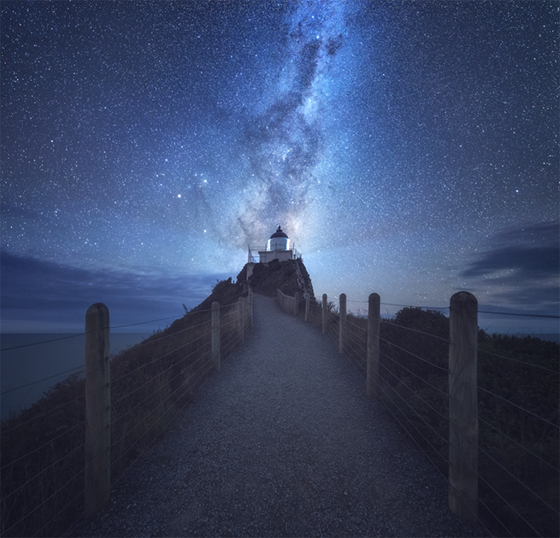
Perfect Timing – Milky Way at Nugget Point
The Clouds Did Part
I planned this image about 7 months ago. Using my Photopills app, I worked out the new moon date and what time the galactic centre would be over the lighthouse like this. The Milky Way would be in position at around 11pm.
 Unfortunately, the sky was black with clouds when we arrived. We could make out the odd star, here and there, popping through the clouds, but by 10pm the chance of capturing this scene looked bleak.
I’d expected Nugget Point to be packed with other photographers, but was pleasantly surprised to find that my wife and I were the only ones.
We could see that, despite the thick clouds above us, in the opposite direction inland, the sky was relatively clear. And it seemed it was coming our way.
With an hour to go, and nothing else to do, we began a sacred African cloud-go-away dance. Chanting in an ancient tongue, we summoned the cloud God and asked him if he’d kindly shift those clouds by 11pm. Clearly impressed with our dance moves, the clouds began to thin out. By 10.50pm the sky was clear in all of the right places.
The shoot went extremely well. We’d been staying at a lovely accommodation called ‘Mike & Jenny’s‘ at Kaka point. Each day we’d tell Jenny if we needed to extend our stay another night because the weather wasn’t playing ball. It was nice to finally show her this image and be moving on. Having said that, we did enjoy our time there. And she gave us an amazing bacon and egg sandwich for our journey north to Dunedin. That’s what I call a successful 24 hours. Great Milky Way showing and a delicious sandwich.
________________________________________________________
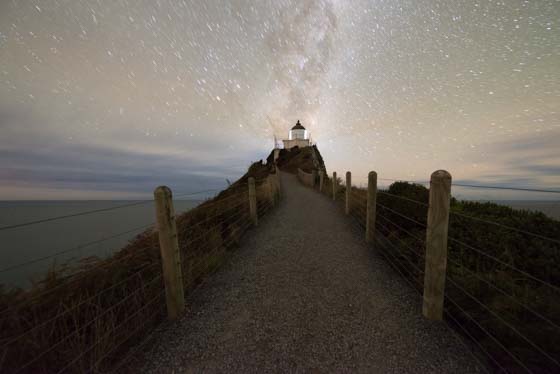
How I Created The Image – Before/After Post-Processing
The Cool Bits -Technical Info
Processing Time: 40 minutes
Exposure Blending method: Hand painted
No. of Exposures: 3 – 1 brighter exposure 3 mins long for the foreground. 1 darker foreground exposure for the stars 25 seconds long. 1 higher exposure (this image is a pano), 25 seconds long, capturing more of the stars.
EV Range: N/A
Aperture: f/3.5 (brighter exposure) & f/2.8
ISO: 6400
Focal Length: 14mm
Lens: Nikon 14-24 f/2.8
Camera: Nikon D800
Plugins: Nik Color Efex
Luminosity Masks: Used to create softer shadows, and brighten the stars.
Workflow Explanation – Nugget Point Milky Way
This image was created using Raya Pro – The Photoshop Plugin.
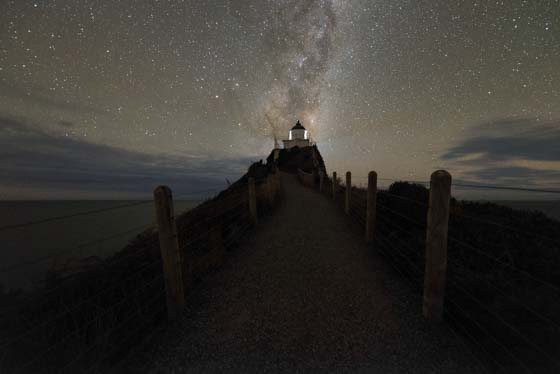
This image is a vertical panorama. I shot two foreground images. One was a 3 minute exposure which exposed nicely for the foreground. The other was a 25 second exposure which exposed for the stars. I then shot another exposure, this time panning upwards to capture more of the stars.
To blend the two foreground exposures I first matched their brightness to some degree in Adobe Camera RAW. I then layered them and just hand painted the walkway and water from the brightest exposure, into the darkest exposure. This left me with sharp, nicely exposed for stars, and well lit foreground with less noise.
Since the earth is rotating, giving the impression the stars are moving, Photoshop sometimes doesn’t like to stitch Astro panos together. I think on this occasion, since the top tile didn’t contain much of the foreground, it probaby wouldn’t have been a problem. However, I decided to manually stitch the pano.
I did this by choosing the crop tool and expanding the foreground image upwards. I created a new layer, chose the Clone tool and went over to the top tile, which was open in a different window in Photoshop. From there, I chose a distinctive star near the lighthouse and selected that to be cloned. Then I went back to my foreground window, found the same star, clicked on it with the clone tool still selected. Then I made a larger clone tool and just started cloning over the blank space above the foreground layer. This created a nice pano.
For the rest of the processing, I love going for a colder colour cast in my astro photography. I have no idea why – it just clicks with me. So that is what I did here. I actually made the scene colder by sliding the temperature slider left in ACR at the beginning of the workflow. To add even more blues I destaturated a little bit the other course in the image, and then added some blues to the shadows via a Curves layer.
One thing I forgot to mention, there was a little bit of colour noise in the bright foreground exposure after some editing in ACR so I just moved over to the HSL/Grayscale module and desaturated any magentas/purples/reds. This did the trick nicely.
Although the walkway is an important part of this image, it should be a lot darker than the Milky Way. I had to create a number of contrast adjustments to get the balance of light just right. Essentially, I darkened the foreground by shifting the midtones down in a Levels layer. I then created Darks luminosity masks in Raya Pro. I used a Darks 3 mask to remove the shadows from the Levels adjustment. This made sure the foreground remained dark, but the shadows weren’t darkened too much.
I used a Brights 3 luminosity mask, again created with Raya Pro, to select the bright stars. With that selection I brightened the stars with a Curves layer. I create a couple more contrast adjustments to try and get the overall feel right. And then I used Nik Color Efex’s Pro Contrast filter, just a little bit, to give the details in the image a little kick.
I softened the image with a Bright Orton effect from Raya Pro, which I added only to the darker tones.
I now had an image I was generally happy with but it was wide open. I need to push the viewer’s eye right to the centre of the image, where the lighthouse meets the Milky Way. I did this with my usual vignette, which darkened around the image but brightened the target area nicely. You can see how to do that here: Quick Photoshop Secrets 9: Awesome Vignette For a Moodier Scene.
Finally, the image was sharpened and resized using my free sharpening tools, which you can download here: Quick Photoshop Secrets 16: Perfect Sharpening & Resize for the Web
As always, I hope you found this useful.
Jimmy

Share this:

This entry was posted on Sunday, April 24th, 2016 at 12:06 pm
You can follow any responses to this entry through the RSS 2.0 feed.
Epic Jimmy!!
Thanks mate. I hope all is well!
That’s a beauty man 🙂
Thanks Prakash 🙂
Perfect, thanks for sharing
Really amazing. Love the colors
Your imagery makes this Canadian want to return to NZ even more than before. Thanks for sharing your post-processing techniques.
Beautiful article and very nice shot Jimmy. Thanks for these useful notions! Cheers 🙂
An astoundingly beautiful image, Jimmy. Wow, just amazing.
Beautiful image Jimmy! I am always impressed an inspired by your work. Thanks for sharing.
Awesome shot!!! The workflow looks a bit complex. Would you mind doing a video on this. Appreciate the help!!! Thank You!!!