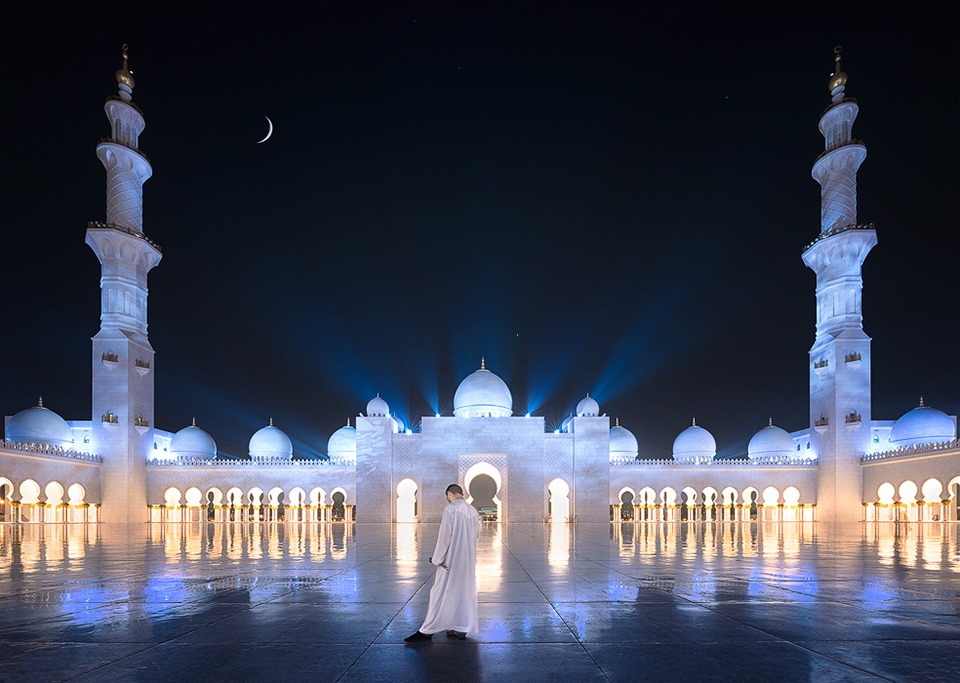
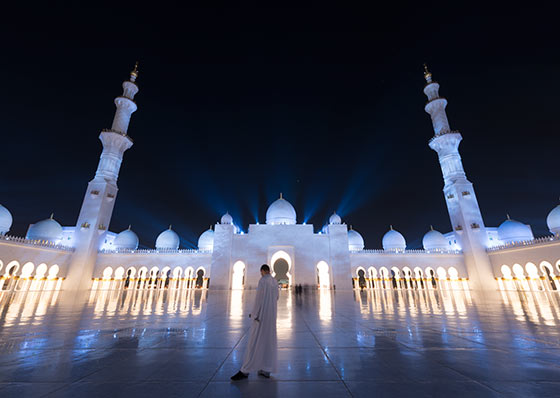
Sheikh Zayed Grand Mosque at Night
Switching to a Mac
On Saturday I bought a MacBook Pro. I’d been threatening to switch from PC to Mac for a while now. Those D800 files are big enough, but pile them on top of each other, along with a few adjustment layers and luminosity masks, and they quickly become a burden to the system. My MacBook handles these workflows a lot better than my laptop.
And, of course, I love the retina display.
But I feel like I’m learning to ride a bike again, especially with photo editing. I’ve calibrated the monitor blindly (without a calibration tool). The MacBook has naturally more contrast, and a warmer temperature to my laptop (most PCs are typically cool), so I edited a few test photos yesterday on the Mac and viewed them on my laptop, and the results are surprising.
 Essentially, I’m attempting to get the same results on my Mac as I did with my laptop, with the same type of editing, but I wasn’t having success. On the Mac, the images look good, but on my laptop, they were too blue, and with very little contrast.
I’ve changed my processing style now, to compensate for the differences. I’ll be paying closer attention to image temperature and the histogram until editing on the Mac becomes more natural for me. With these changes, I’ve been very happy with the standard of images I’ve produced on the Mac this morning.
Any experienced Mac users with any tips for a newbie, I will be glad to hear them 😀
Update: After constant crashes while using Photoshop (Display Driver issue), I’ve sent the Macbook back and awaiting the results. Not a great start.
________________________________________________________
How I Created The Image – Before/After Post-Processing
The Cool Bits – Technical Info
Processing Time: 30 minutes
Exposure Blending method: N/a
No. of Exposures: 3
EV Range: 0
Aperture: f/16
ISO: 100
Focal Length: 14mm
Lens: Nikkor 14-24mm f/2.8
Camera: Nikon D800
Plugins: Nik Color Efex
Luminosity Masks: N/A
Workflow Explanation – Sheik Zayed Grand Mosque
Would you like to learn my post-processing techniques? Feel free to check out my course: The Art of Digital Blending & The Art of Cityscape Photography
It’s a rare day when I include a person in my images. But this gentlemen proved to be the ideal foreground element for this image. I was shooting long exposures (20 seconds), to reduce the number of people in the frame.
This fella was standing in the left of the frame initially, with his friend. After I shot a few exposures, he walked to this spot and started texting. I had just opened the shutter when he did this, so although I knew that him being there would enhance the image, I thought that there was no chance he would stand still enough for a 20 second exposure to capture him.
As soon as the shutter closed again, he walked away. I checked the image and was pleasantly surprised to see he was relatively in focus. It must have been a very important text message to have captured his attention so intently.
In order to create a tourist-free scene, I layered three exposures and blended them, using the method found here: How to Remove Tourists From Your Photos
Then I expanded the image canvas by choosing the Crop tool and instead of cropping in, I dragged outward, thus creating space around the image. I did this so that after correcting the perspective distortion in Photoshop, nothing would be pushed out the frame, and cropped out automatically.
In Lens Corrections, I corrected much of the perspective distortion and then cropped the image down until I was happy.
The challenge of this image was separating the man in the foreground, from everything else. As you can see in the original image, it’s a little difficult to separate him from the ground. I had to make him stand out. I considered two ways of doing this. Either I could make him brighter in relation to the floor, or make him darker, and brighten the floor up. I tried both options, and settled on the first one; brightening him up.
One of the elements I wanted to emphasise here, was the reflection of the mosque walls and lights in the shiny floor. I did this with a combination of Nik Color Efex Pro Contrast filter, a Levels layer, and dodging and burning. For each layer, I masked out the man so he wasn’t affected.
Once I had darkened the floor and dodged the highlights in the floor, I then applied a Levels layer to the man, to brighten him up a touch. I zoomed in and slowly masked around him. Thanks to the Wacom pressure sensitive pen, that wasn’t too much of a challenge.
I applied a Detail Enhancer layer from my Easy Panel, on the centre part of the wall, where the light patterns are, just to give them more life. I then added a moon from a shot I took about 2 years ago. And finally, I finished with a soft vignette around the image.

Share this:

This entry was posted on Monday, March 23rd, 2015 at 3:44 pm
You can follow any responses to this entry through the RSS 2.0 feed.
The figure needs to take three steps back/to right of picture.
Great image Jimmy! Is there any recommended way of dealing with skewed disks on top of minarets?
Joe, I was going to mention that also. The skewing is due to the lens corrections. (Compare before and after images.) To avoid the skewing you need to pay close attention to the lens correction process. Another solution is to use warp in free transform to correct it … better to avoid it in the first place if possible.
Strange that you had an issue with Photoshop…CC 2014 is working perfectly for me on my rMBP with Yosemite. Granted…it’s a 2012 model and not the latest version but that should make no difference. I recently switched from Aperture to Lightroom for managing my library with Aperture’s impending demise but as you know LR exports to/from Photoshop very nicely.
Your image of the masque is great and your post processing is way beyond me and I always learn something new from your newsletters. What I simply can’t understand is why you aren’t color calibrating your monitors. There is no reason to be fighting to make two displays the same when it is so easy to color calibrate them.
The human eyeball simply can’t be used for accurate color calibration – you need a hardware device. I strongly recommend you get an X-Rite i1Display Pro. While you are at it pick up an X-Rite ColorChecker Passport and color calibrate all your camera sensors and lens combinations. You will never regret the money spent.
Thank you for the suggestions Don. I will consider them in the future.
The truth is, I have no reason to calibrate my monitor. I literally never print my images. I don’t sell stock, or prints. My business is 100% online, and the only thing that matters for me, is that the images render well across different displays. It has worked extremely well so far, so I’m not looking to change it. You know the old saying: “If it ain’t broke don’t fix it.” 😀
But if I do decide to start selling prints, then I will certainly look into your suggestions.
Brilliant shot Jimmy, I was lucky enough to be in Abu Dhabi xmas 2014 and went to see the mosque, just to many bodies around to get a shot like yours though.
I actually switched to Macbook Pro for the same reason as you. But I found it to be way to slow.
But then again, I have always been used to work with highend windows laptops. So I went out and bought a Clevo laptop with ai7 and a GTX970m graphic card. That can handle my big D800 files so much better.