A Flash Of Light – Dubai Marina – Tutorial Included
Things to come in the next 12 months and after Korea
Rachel and I have been discussing the next phase in our lives, after we leave Korea in February 2016. We plan on heading straight to Australia and New Zealand for 3 months, for some incredible landscape photography. After that, we may finally buy a place in the UK.
The idea of putting down real roots somewhere is both comforting and unsettling, especially after 5 years of being ‘root-less’. We will still be travelling regularly, so hopefully our feet will be itch-free.
 Up until now I have taught a handful of limited, private workshops around the world. I’ve kept myself fairly private, and have politely declined most workshop requests. After Korea, however, I will begin teaching advanced digital blending workshops. I will keep the class numbers very low, and only teach a few each year, but I look forward to seeing people develop in the field and in post-processing over a short period of time.
For the next 12 months I need to take advantage of this Asian hub we are living in. I’m just a short flight to various destinations in China and Japan, and a close distance to many other must-shoot locations. China is, more than likely, the next destination.
I have plans for one more advanced video course, where I teach the workflows and shooting techniques used in my most popular images. The Easy Panel will be extended, with some added digital blending options. And I will create a large library of Lightroom Presets. I will also publish my Digital Blending guide, free to my email subscribers.
All in all, the next 12 months will be very productive. And after that, it will be new territory indeed.
________________________________________________________
How I Created The Image – Before/After Post-Processing
The Cool Bits – Technical Info
Processing Time: 20 minutes
Exposure Blending method: Luminosity Masks
No. of Exposures: 5
EV Range: -2 to +2
Aperture: f/5 to f11
ISO: 100-400
Focal Length: 14mm
Lens: Nikkor 14-24mm f/2.8
Camera: Nikon D800
Plugins: Nik Color Efex
Luminosity Masks: Brights 2 used to restore the shadows
Workflow Explanation – Dubai Marina at Night
Would you like to learn my post-processing techniques? Feel free to check out my course: The Art of Digital Blending & The Art of Cityscape Photography
Something Different: I wanted to try something different this week, which I hope you will find useful/interesting. I’ve uploaded the full PSD for this workflow for you to download, inspect and play with. You can see all the steps I took to arrive at this image, and create your own version.
I’m happy for you to publish your version of this image online, but please credit me as the photographer, and include the link to my Easy Panel: https://www.throughstrangelenses.com/easy-panel-download-for-photoshop/
The download is about 470mb in size s it may be a bit slow, and if the link doesn’t work, please try it with a different internet browser (Internet Explorer, Firefox, Chrome etc.).
You can download the file here: http://www.mediafire.com/download/fq26yff3t8t1c07/Jimmy+McIntyre+-+Marina+Dubai.zip
On to the workflow…
I created a video tutorial showing you exactly how I created this image:
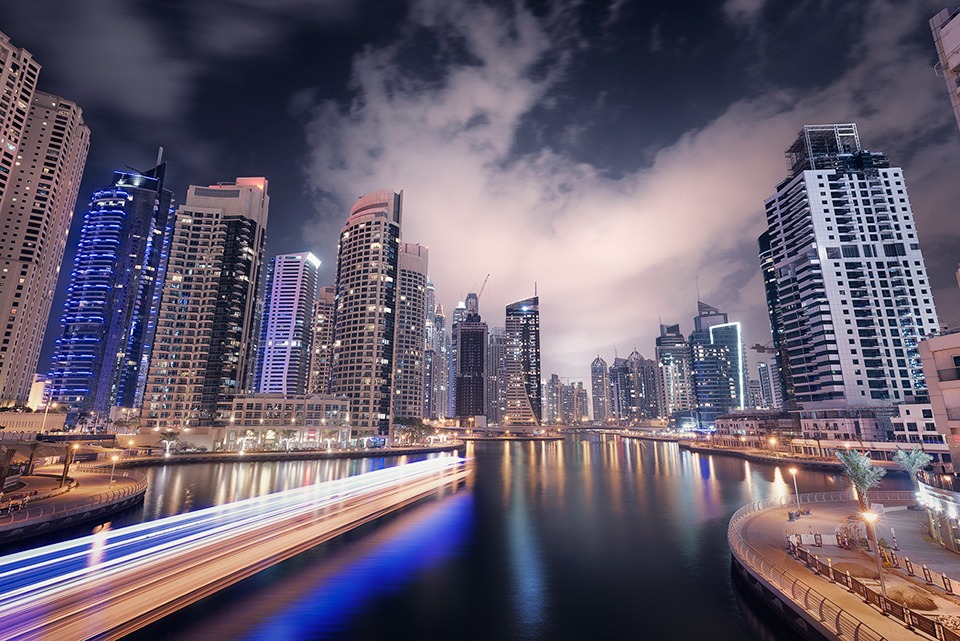
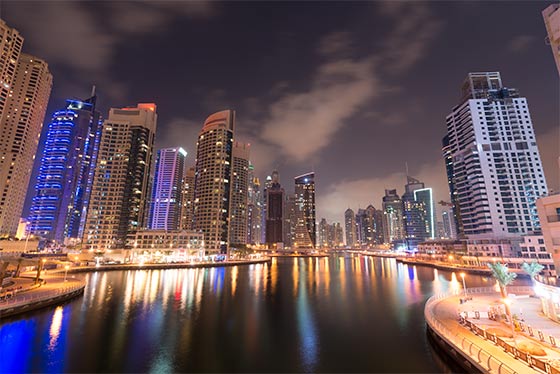
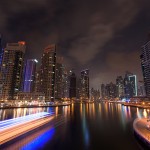
This image was taken purely by chance. I was in a friend’s car, going home after a night shooting in Dubai when I saw these dramatic clouds over the marina. Clouds are extremely rare in Dubai. So I jumped out, ran to this spot and captured these clouds with a fairly quick exposure. The image, however, was flat. The foreground was empty.
I decided to wait for something to happen. I wasn’t sure what. After a while, a very interesting boat was slowly making its way down the marina. I wanted to capture some light trails from it so the foreground would now have a dynamic element. It was travelling incredibly slowly, so I needed two exposures at 20 seconds each, to capture the light trails you see above.
I captured a brighter (same exposure as the first shot of the cloud I took), long exposure with smooth water, which would be my base layer. Finally I captured a darker exposure to recover the blown-out highlights in the base exposure.
In the end I had 5 exposures; 1 base exposure, 1 darker exposure, 2 light trail exposures, and an exposure with dramatic clouds.

In Photoshop I blended the base exposure with the darker exposure with a Brights 2 luminosity mask, and a brush opacity of 70%. For the light trails I did the usual quick blend, by changing the Blend Mode to Lighten. And for the dramatic cloud exposure, since this was exactly the same exposure as the base exposure, I just hand painted the dramatic cloud in the scene.
For colouring I used a lesser-known technique. In the adjustments panel/menu, you will see Color Lookup. By clicking on that and opening the top drop-down menu, you will see a lot of options. These are actually very cool colour presets in Photoshop that few people know about.
I used a combination of FuturisticBleak (30% opacity) and FoggyNight (40% opacity) to achieve a mildly de-saturated look, while adding dark blue tones throughout. I added to these blue tones by opening a Color Balance layer, and adding +10 Blues to the shadows, and then +5 blues to the midtones. I decided that these changes were a bit strong, so I reduced this Color Balance layer to 50%.
The image was a little bit flat so I added strong local contrast through Nik Color Efex’s Pro Contrast Filter. And I also added a gentle vignette to focus the eye on the dramatic cloud using the Darken/Lighten Centre filter.
I added a Levels layer and increased the highlights, but only painted this adjustment into the main clouds, to pull the eye further towards this region.
Finally, I merged all of these layers non-destructively (CTRL+ALT+SHIFT+E on a PC, CMD+OPTION+SHIFT+E on a Mac), added a motion blur by going to Filter>Blur>Motion Blur. I used a blur of 166. Then I created a black mask on this new blurry layer, and just painted the blur into the light trails reflections in the water. This made the light trails reflection more consistent with the rest of the smooth water, and helped to contrast the sharp light trail edge with the smooth water.
And that was everything. I hope you enjoy the PSD file!

Share this:

This entry was posted on Sunday, March 15th, 2015 at 5:55 pm
You can follow any responses to this entry through the RSS 2.0 feed.
Jimmy, you can visit Vietnam, Camdia and Laos while you are still in the area 🙂
The list keeps growing 😀
If you need a guide to show you around Melbourne when you get to Australia let me know.
Thank you very much Barrie. I actually have family in Ballarat so it would be nice to go back 😀
I have a problem in that when I use my white brush on the image it comes out a muddy grey colour. I must have something wrong but I cant see what i’m doing wrong… any ideas ?
Hi Gerry,
Make sure there is a big enough difference in brightness between areas, so that you can make a clean selection (and that the area you wish to blend is actually over-exposed/under-exposed.
This article may help: http://www.shutterevolve.com/luminosity-masks-cant-paint-inside-selection/
Just playing around.
Thanks’ Jimmy for your generous knowledge sharing
As usual a brilliant picture and accompanying tutorial. For the final optional step of Perspective correction I sometimes use Edit > Transform > Distort which works for extreme wide angle distorted views. Nevertheless amazing picture and love the boat trails. Worked through your entire LM course a few months back and that seems to be the most frequently used workflow that I resort to. Thanks for all the knowledge that you’ve shared so far and wish you all the best for the future!
Hello Jimmy. I have a question. I have just started using photoshop a month ago. I worked through some beginner tutorials and then I tackled the tutorial I purchased from you nearly a year ago. This is my first edit using your luminosity masking. The sky is blown a bit and the canyon was completely dark. I thought it was one for the delete button, so I used it to see what your tutorial could do for me.
http://500px.com/photo/100221837/window-to-the-badlands-by-sandra-nightski?from=user_library
My question is this. I have a whole list of actions in my actions window that were specific to this image. They pop up when I try to run actions on a new photo. Do they affect the new photo? Am I supposed to clear them out somehow when I am done?
Could you post a psd for one of your landscapes too like the marina posted previously? Great work.