We Are The Zenith, Busan
We Are The Zenith
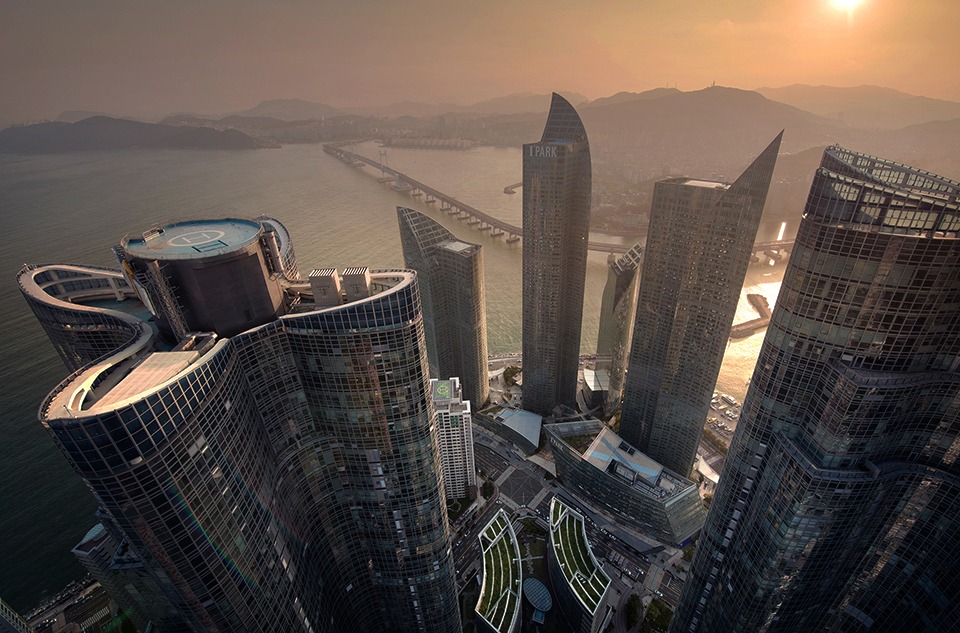
Saturday evening was my 3rd attempt at getting on the helipad of one of Korea’s tallest buildings, We Are The Zenith, in Busan. The first two times I didn’t even make it to the elevator.
This time, with a few new friends, we made our way through a side exit, found the service elevator, and finally set foot on the roof of that colossal building.
The view was spectacular. Sadly it lasted only a few minutes, as two security guards quickly called an early end to our adventure. They were immune to our $200 bribe.
They let us take one shot before we left. I quickly shifted camera settings, switched to auto-focus, the first time I’ve used that in years, and climbed up onto a small ledge. You have to lean right across a ledge to take this shot. I held my breath to keep my camera steady, composed, and fired off a set of 5 brackets. I hoped I’d caught something useable.
Since this all happened about 30 minutes before sunset, the light wasn’t great. None of us came away with the image we’d planned.
But now we know a way in. There will certainly be an attempt number 4, and possibly 5, 6, 7….
Thanks to Simon Bond for showing us the way in.
The Cool Bits – Technical Info
Processing Time: 25 minutes
Exposure Blending method: Gradient masks + Rapid Blend If
No. of Exposures: 3
EV Range: -2, -1, +2
Aperture: f/9
ISO: 100
Focal Length: 14mm
Lens: Nikkor 14-24mm f/2.8
Camera: Nikon D800
Plugins: Nik Color Efex for local contrast adjustment and change of light balance
Luminosity Masks: Used to bring down the highlights in the sky slightly and add selective warmth.
Today’s Photo – The Peak
Please remember: You can download my free luminosity mask actions, as well as other great actions, for free. Find Out More.
I created this by blending 3 exposures, spanning a range of 4 stops of light. I blended the -2 and -1 exposures very quickly using the Rapid Blend If technique taught in the Art of Cityscape Course. With the sky nicely balanced I then used a gradient mask to gently blend the darker exposures into the brighter exposure. Here is a tutorial I created showing you how to do that – Sky Replacement Tutorial.
There was some sun flare in parts of the image. I removed some but felt that the rest didn’t detract from the scene, especially the rainbow colours in the building to the left.
I added a warm filter, and applied the same gradient mask to that adjustment so that the buildings in the near foreground weren’t too warm. I mainly wanted the sky to be warm. However, the gradient mask excluded the bright reflection in the sea and the bright part of the top of the building to the left, both of which should be warmed by the sun.
Using luminosity masks I was able to select these bright areas and mask the warmth back in, creating a more natural feel.
Enjoying my ongoing obsession with foreground textures, I planned, many months before getting up here, to emphasise the beautiful patterns and textures on the two nearest towers. A simple local contrast adjust in Nik Color Efex’s Pro Contrast Filter did the job.
Finally I added a touch of contrast throughout and then finished with a vignette in the lower half of the image only.


Share this:

This entry was posted on Monday, July 28th, 2014 at 1:14 pm
You can follow any responses to this entry through the RSS 2.0 feed.
Nicely captured rooftop photo in Busan. Sounds like quite an adventure…..
Thank you Miguel!
Thank you Miguel!
Inspirational as always, Jimmy!!….new follower btw. (Australia)
Thank you very much Brett!!
Too bad with the bribe! What a view. I’d love more anecdotes on how to get to such areas..
The rapid blend you refer to is the same as in your interior shot tutorial? Best wishes from a student follower, following your freebies stuff 🙂
Mrnielsen, denmark
Hi there,
That is right. It is the same technique as the interior tutorial 🙂
Any tips on where that back exit is? 😉 I was there last night amd the view from the ground wasn’t terrible but nothing like the top. Even at the bottom a security guard came up after 10 or so minutes and asked to see what I was taking pictures of and asked how long i would be. He was nice about it though.
Hi Nate,
That’s a beauty of a shot! I may have to steal your composition (all credit will be given of course). The entrance we used was to the right of the main entrance. It’s one-way so you have to wait for someone to exit first. Then we walked straight, took a sharp left, passed some elevators, and another lift through a white door. That was the service elevator which took us to the top.
I’d love to see what you could do with it too~ I jealous that you live in Busan and can head over whenever the conditions are looking good! Sounds like a Mission Impossible plot just trying to get to the top haha I think it would be easier if I were Korean and didn’t have my foreigness advertising that I wasn’t supposed to be there haha.
I shouldn’ve offered free English lessons to the family I met who lived on the 80th floor haha.
Amazing photos! Was there a code you had to enter before getting to the top? I went there today and took the service elevator but it would only let us go to the 80th floor and then we tried stairs but at the top, there was a key card swipe thing and buttons to enter a code! Needless to say, we didn’t make it to the roof haha so bummed!