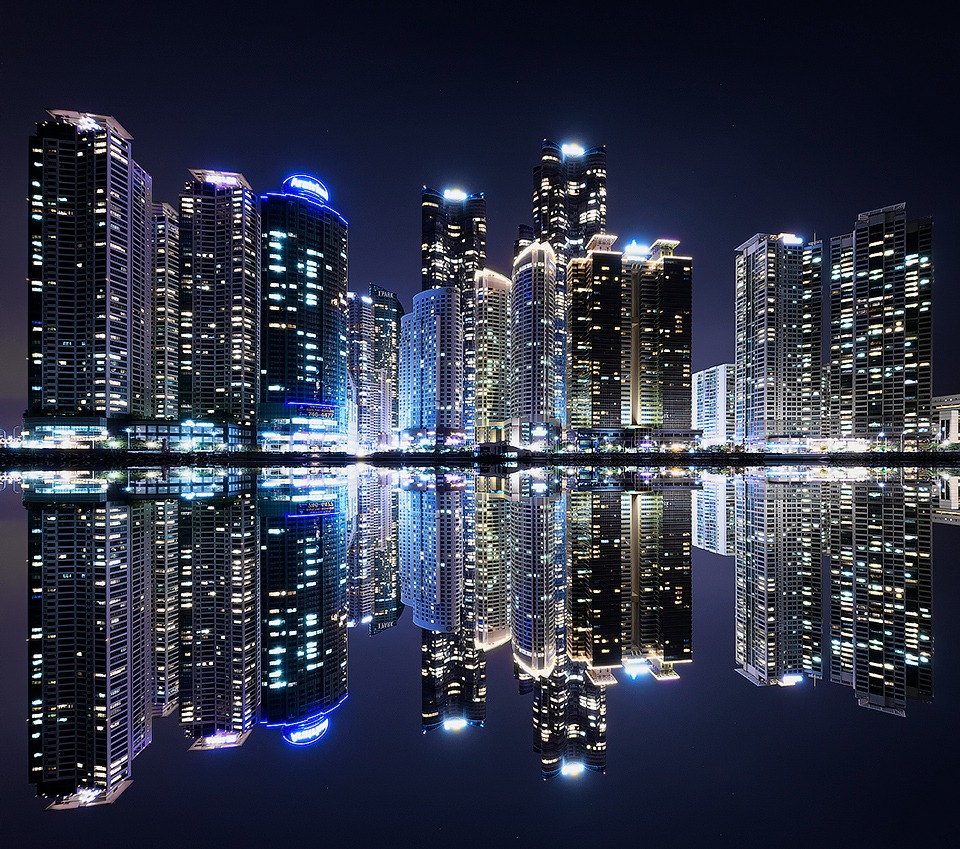
Busan City Skyline
For anyone wishing to learn how to process an image like this, please feel free to check out my Cityscape Tutorials
Making the move to South Korea has been an interesting challenge. It feels wonderful to be back. I’d almost forgotten how brightly lit and busy the streets are, even at night. I missed this energy.
Our first priority was to find a favourite coffee shop nearby – we’re still undecided, but since this is Korea there’s plenty to choose from.
Now we’re in the process of forming good habits in our new life, exercising, meditating, not drinking too much…
In the next couple of months I plan to visit China, Hong Kong and Korea – hopefully there’ll be plenty more cityscapes and landscapes to come.
The Cool Bits – Technical Info
Processing Time: 30 minutes
Exposure Blending method: N/A
No. of Exposures: 1
EV Range: N/A
Aperture: f/8
ISO: 400
Shutter Speed: 2 seconds
Focal Length: 14mm
Lens: Nikkor 14-24mm f./2.8
Camera: Nikon D800
Plugins: Nik Color Efex for change of light source & Nik Dfine for noise removal
Luminance Masks: N/A
Today’s Photo – Busan City Skyline
This is a composite. The windy weather and choppy water made any chance of a refection impossible. Colour control was extremely important in this image. As you can see in the original, I’ve desaturated most of the colour, especially the reds and pinks, while maintaining a cold, blue tint. This works extremely well in creating a futuristic feel when you’re shooting modern cityscapes.
Although I bracketed this scene, I chose not to blend in the darker exposure to pull back the highlights. I wanted the city lights to brightly glowing.
The D800 – The image quality of the D800 compared to the cropped sensor cameras I’ve used is staggering. Not only can you recover a large of amount data in the RAW files, combining it with the 14-24 f/2.8 leaves you with intensely sharp images relatively free from unwanted artifacts. I pushed this image to its limits in terms of barrel distortion correction, yet, the buildings remained perfectly sharp. I can say with some confidence that the result would have been different if I were shooting with my 60D.
Before/After Comparison


Share this:

This entry was posted on Wednesday, March 12th, 2014 at 7:23 am
You can follow any responses to this entry through the RSS 2.0 feed.
Very nice. Glad to see you are posting again.
Thanks Angelina! It’s good to be posting again 🙂
Please do share with us your experience in South Korea along with beautiful imagesthat you produce.
Great image as always … wonderfully inspiring … sending best wishes to you in your new adventure in S. Korea!!! How exciting!!
Best wishes to you too, Lois!
Fantastic Jimmy. You have me sold on the barrel distortion correction and I agree with your blue view giving the buildings a futuristic feel. You certainly know your craft, and your write ups are a great read as well. 🙂 Happy travels.
Thanks David!
Great foresight here Jimmy 🙂
The D800 is an immense bit of kit and I’m still learning what I can get from it coupled with the 14-24.
Question about barrel distortion; did you use DxO Optics?
Hey Craig, this is the first I’ve heard of DxO Optics 🙂 I used Photoshops Lens corrections and the Distort tool.
It’s a very powerful piece of software bud, and easily out-performs both LR and PS for lens correction.
Have you looked at Capture One pro? I’ve been using it for the last week; it’s again and very special bit of kit. Its ability to pull from shadows is phenomenal compared to LR and PS and so is it’s noise reduction; I just haven’t worked out how to bring it into my work flow as yet lol
Sound very interesting. I don’t have any complains with what I’m using at the moment, but it’s always good to keep your options open. Thanks for the suggestions Craig.
I’ve big big problems with the D800e and ‘long’ exposures, as have have lots of others…. little white spots, thousands of them. You obviously can use in camera NR, but when doing a 5/10/15min exposures, having to wait that time again for it to do it’s thing isn’t great! You could miss the best shot of the morning/night during that time.
Capture One Pro has a ‘single pixel’ slider in the NR panel, which is brilliant for removing those spots, as well as hot spots. It doesn’t remove them all, but does a much better job than spending two hours spot healing at 100% in photoshop lol
This is AWESOME, Jimmy! Love those details in the architecture and city lights, well composed and executed my friend!
Thanks man, and thanks for the link on Light Stalking too 🙂
MAsterly Done, wonderful and fantastic 🙂