Candles at Petra
New Journal 65 – Candles at Petra
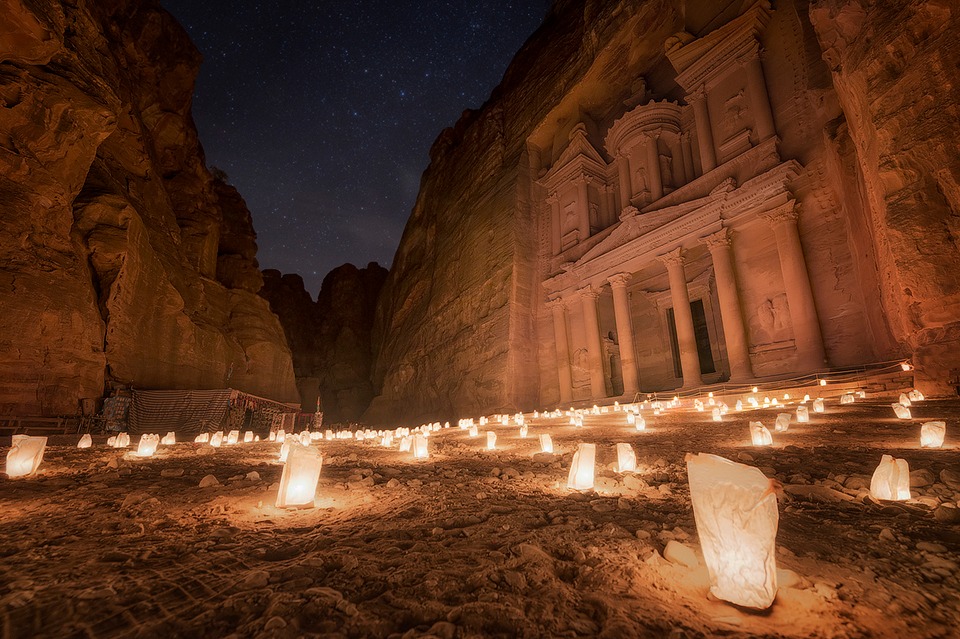
This was the shot I went to Petra for. I was apprehensive leading up to this point. Researching Petra by Night, it was very difficult to find a tourist-free image. I knew that I was in for a challenge.
As I sat on the stones, facing the treasury. The Bedouin story teller finished his tale and gave everyone time to walk through the candles. I sat still, shooting the same base image, hoping that the sum of these shots would amount to an almost tourist-free image.
5 minutes passed by and the number of tourists around had begun to dwindle. However, the workers were also beginning to put the candles out. They were stomping the flames around me but I hadn’t finished shooting. I quickly shifted my settings 3 times and shot 3 different exposures just as someone put the candle to my right out.
Just in time, I hoped.
The Cool Bits – Technical Info
Processing Time: 2 hours
Exposure Blending method: Luminosity Masks
No. of Exposures: 4 (plus 6 base exposures)
EV Range: -N/A
Aperture: f/5.6
ISO: 400
Shutter Speed: from 2-20 seconds
Focal Length: 14mm
Lens: Nikkor 14-24mm f./2.8
Camera: Nikon D800
Plugins: Nik Color Efex for change of light source & Glamour Glow
Luminance Masks: Darks 5 and 6 were used on all lower exposures
Today’s Photo – Petra By Night
Using the same technique I used in my Remove Tourists tutorial, I layered all six base images into Photoshop and began to mask through certain areas. The final image still had the odd tourist here and there, but some cloning and reconstruction using parts from separate compositions helped to construct a tourist free shot.
Basic colour corrections were first done in ACR and then a few slight Color Balance layers got the image to where I wanted it to be. I layered in some stars from a shot from Wadi Rum, and like my last Petra shot, I didn’t want the sky to be too striking so I lowered the contrast a touch.
I gently layered in details from the blown out candles using 3 lower exposures. Using luminosity masks I painted in the brightest of the 3 exposures first, at a low opacity, and did the same with the other two, so that the transition between exposures was subtle.
I completely shifted the balance of light using Nik Color Efex’s Darken/Lighten Centre filter. By applying this selectively I illuminated the front of the building and took some of the glaze from the candles, which needed no extra emphasis. I also added a vignette which too emphasis away from the sides of the image which don’t hold anything of compositional value.
I then added a Glamour Glow layer from Color Efex which I painted in at varying opacity in the image.
Reminder – Download Luminance Mask Actions
You can download my 18 point luminance mask actions for Photoshop completely free – [wpdm_file id=1]
Before/After Comparison


Share this:

This entry was posted on Wednesday, December 11th, 2013 at 1:11 pm
You can follow any responses to this entry through the RSS 2.0 feed.
I could feel your frustration to get a pretty decent shot.. and you can’t ask people to get away from your view because that is just so selfish and you don’t want to labeled the biggest jerk of the night.
And wow to what you did on the photo. This is what I need, though I sometimes like people hanging out on my photos, but there are times that they’re not to be there. I also checked on the tutorial you posted for this technique, and I can’t thank you enough. Awesome job! Glad I stumbled here on your site. 🙂
Excellent work… marvelous image … thanks so much for sharing Jimmy.