Petra by Night – Inside the Treasury
New Journal 64 – Petra By Night, in the Treasury
A tourist-free Petra is a rare occurrence. However, speaking to the right people, politeness and a touch of bribery can buy a photographer 15-20 minutes before the hoards arrive for Petra by Night. As we passed the security gate, we picked up our pace and began running. It’s roughly a mile to the treasury, which isn’t a great distance, but when you’re loaded with camera gear, running on uneven terrain in near pitch-blackness, you tend to tire quickly. The quicker we ran, the longer we’d have before the hundreds of tourists would make our jobs very challenging.
With sweat in my eyes, I passed through the narrow path and entered into the candle-lit chamber. A few workers were still setting up candles. We know time was limited. After a couple of test shots, we headed to a guide and asked if we could enter the treasury which is usually a no-go. We expected a firm ‘no’. To our surprise we were given permission as long as we’d finish before the first tourists arrived.
Since the composition was very tight, we were forced to take turns shooting. As I composed the shot, I could hear voices from down the passage. They would exit right in front of my shot. Thinking I was running out of time, I shot a medium-dark exposure and then cranked up the ISO to capture a brighter exposure with the same shutter speed. Shortly after leaving the treasury the first of many tourists began to filter through.
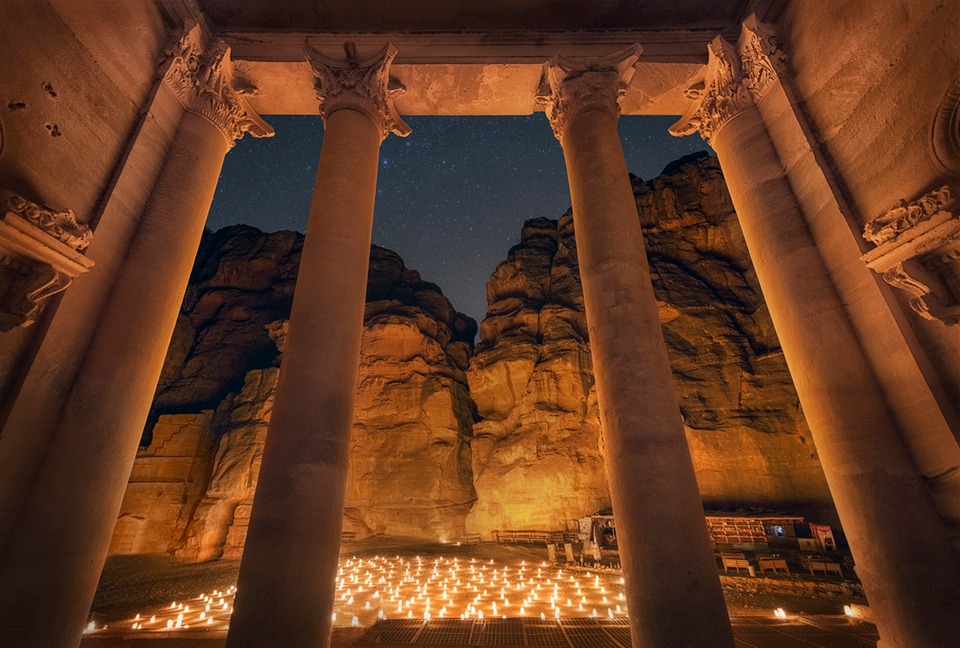
I hadn’t had time to capture the outside of the treasury and opportunities were now fading fast. As we sat for a traditional Bedouin performance I planned my composition and waited. I also had time to enjoy the idea of entering such an incredible building, illuminated so beautifully by hundreds of candles – sometimes we photographers forget to enjoy the moments we’re so intent on capturing.
As the ghostly Bedouin voice sailed through the night and echoed down the many narrow passages, I wondered if I’d missed my chance to capture the image I’d planned to shoot weeks before even coming to Jordan. As the performance ended, people began walking freely amongst the candles. I chose my composition, sat still and waited for the right moments. I haven’t examined the images yet. Hopefully they came out as planned.
For now, I chose to publish today’s image first simply because it is a rare composition which I thought my readers would prefer 🙂
The Cool Bits – Technical Info
Processing Time: 2 hours
Exposure Blending method: Luminosity Masks
No. of Exposures: 2
EV Range: -N/A
Aperture: f/5.6 & f/2.8
ISO: 400 & 3200
Shutter Speed: 20 secs & 20 secs
Focal Length: 14mm
Lens: Nikkor 14-24mm f./2.8
Camera: Nikon D800
Plugins: Nik Color Efex for change of light source, detail extraction & Glamour Glow
Luminance Masks: Midtones 3 was used to gently bring through the brighter exposure
Today’s Photo – Petra By Night
The two exposures were gently blended using luminance masks, which you can learn in my Art of Digital Blending course. You can download my free luminance mask actions at the bottom of this page.
A lot of work was needed on this image. With such a tight time frame, and under poor lighting conditions, my exposures were not what they should have been. They required some much needed love and affection in Photoshop. The White Balance was way out. Both general and specific colour corrections were made. Although the treasury walls were very close in colour to the opposing wall, I chose to desaturate the treasury interior a touch to create greater contrast between interior and exterior elements.
While the image is framed on three sides (top, left & right), I felt the bottom was lacking slightly, so I added a stronger vignette which helped to close the composition somewhat.
The Clone Stamp was used rather liberally to remove people, posts, and a car to the left, where added colour corrections were made. I pulled out detail very selectively inside the treasury, painting a Detail Extractor mask in the columns and the highlighted areas outside of the upper vignette.
A Glamour Glow layer softened the rocks opposite and added softness to the glow of the lamps.
The brightest exposure managed to capture some nicely clear stars in the sky, but being so close to town the stars weren’t strongly visible. I layered in some stars from an image I’d shot the day before in the desert. Although I wanted the sky to have some visible stars, I didn’t want them to be the focus of the shot so I dropped the contrast significantly.
I would never usually shoot at such a high ISO outside of astro shooting, but being so pushed for time, I couldn’t open my shutter longer than 20 seconds. Fortunately, the added noise was certainly manageable.
Reminder – Download Luminance Mask Actions
You can download my 18 point luminance mask actions for Photoshop completely free – [wpdm_file id=1]
Before/After Comparison


Share this:

This entry was posted on Monday, December 9th, 2013 at 11:16 am
You can follow any responses to this entry through the RSS 2.0 feed.
Absolutely awesome