Subway Station in Seattle
New Journal 46 – American Hospitality
From East coast to West and anywhere in between, our American road trip has been characterised by two things: Photography and hospitality. In every single city we’ve visited, local photographers and non-photographers alike have been amazing.
 In our final American leg, Dave Morrow, star photographer extraordinaire, has been awesome in showing us around Seattle. He can party harder than us – I realised that the first day we met. He greeted us with a shot of whiskey and a hip flask of dark rum – such is his enthusiasm for enjoying himself.
I look forward to shooting with him again in some remote part of the world.
It’s hard to imagine that we’ll be in London in just a few days. These three months have whizzed by. It frightens me to think how quickly life is moving on, sometimes. I need to make the most of it.
Our arrival in the UK will mark the beginning of several new projects and exciting journies into new destinations, where hopefully we’ll be greeted with the same generosity shown to us by our friends across the pond and capture some beautiful shots.
The Cool Bits – Technical Info
Processing Time: 2 hours
Processing method: Photoshop
No. of Exposures: 2
EV Range: -2, 0
Aperture: f/5.6
ISO: 100
Focal Length: 10mm
Lens: Sigma 10-20mm
Camera: Canon 60d
Plugins: Nik Color Efex for contrast adjustments
Luminance Masks: Used for exposure blending
Photomatix Settings: N/A
Join Me on Facebook or Google+
![]()
![]()
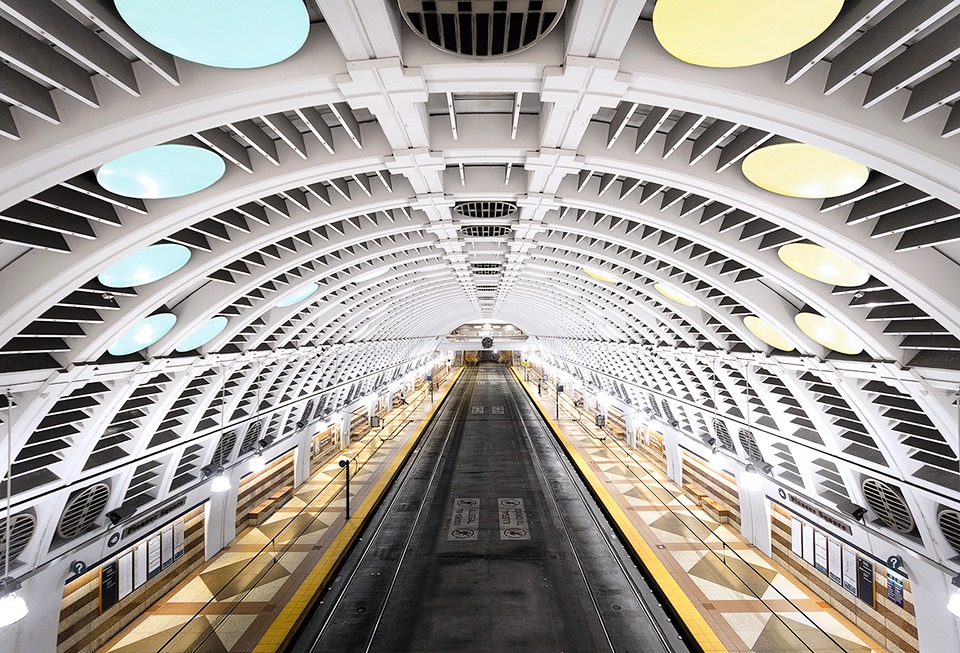
Today’s Photo – The Subway Station
I modeled this shot on Dave’s image of the same place, with a few adjustments. You can see his image on G+, and follow his awesome work too.
The walls really need to be desaturated. Architecturally, the station is a great subject but its colours are extremely lacking. With a simple desaturation layer, I whited the walls and then created a new layer, on which I painted the colours in. I changed the Blend Mode to Soft Light in order to incorporate the painted colours into the image more smoothly.
In much the same way as I brightened up the arch area in my last image (Mesa Arch), I used a simple Levels adjustment layer with a circular selection to bright the end of the tunnel, which in turn created a gentle vignette on the outer edges.
Reminder – Download Luminance Mask Actions
You can download my 18 point luminance mask actions for Photoshop completely free – [wpdm_file id=1]
Before the Joys of Post-Processing


Share this:

This entry was posted on Sunday, July 21st, 2013 at 5:37 pm
You can follow any responses to this entry through the RSS 2.0 feed.